> ## Documentation Index
> Fetch the complete documentation index at: https://docs.aiinsurance.io/llms.txt
> Use this file to discover all available pages before exploring further.
# Endorse a Policy
Endorsing a policy means modifying or adding to the terms and conditions of an existing insurance policy. This guide walks you through the complete process of endorsing a policy step by step.
## Step 1: Navigate to Policies
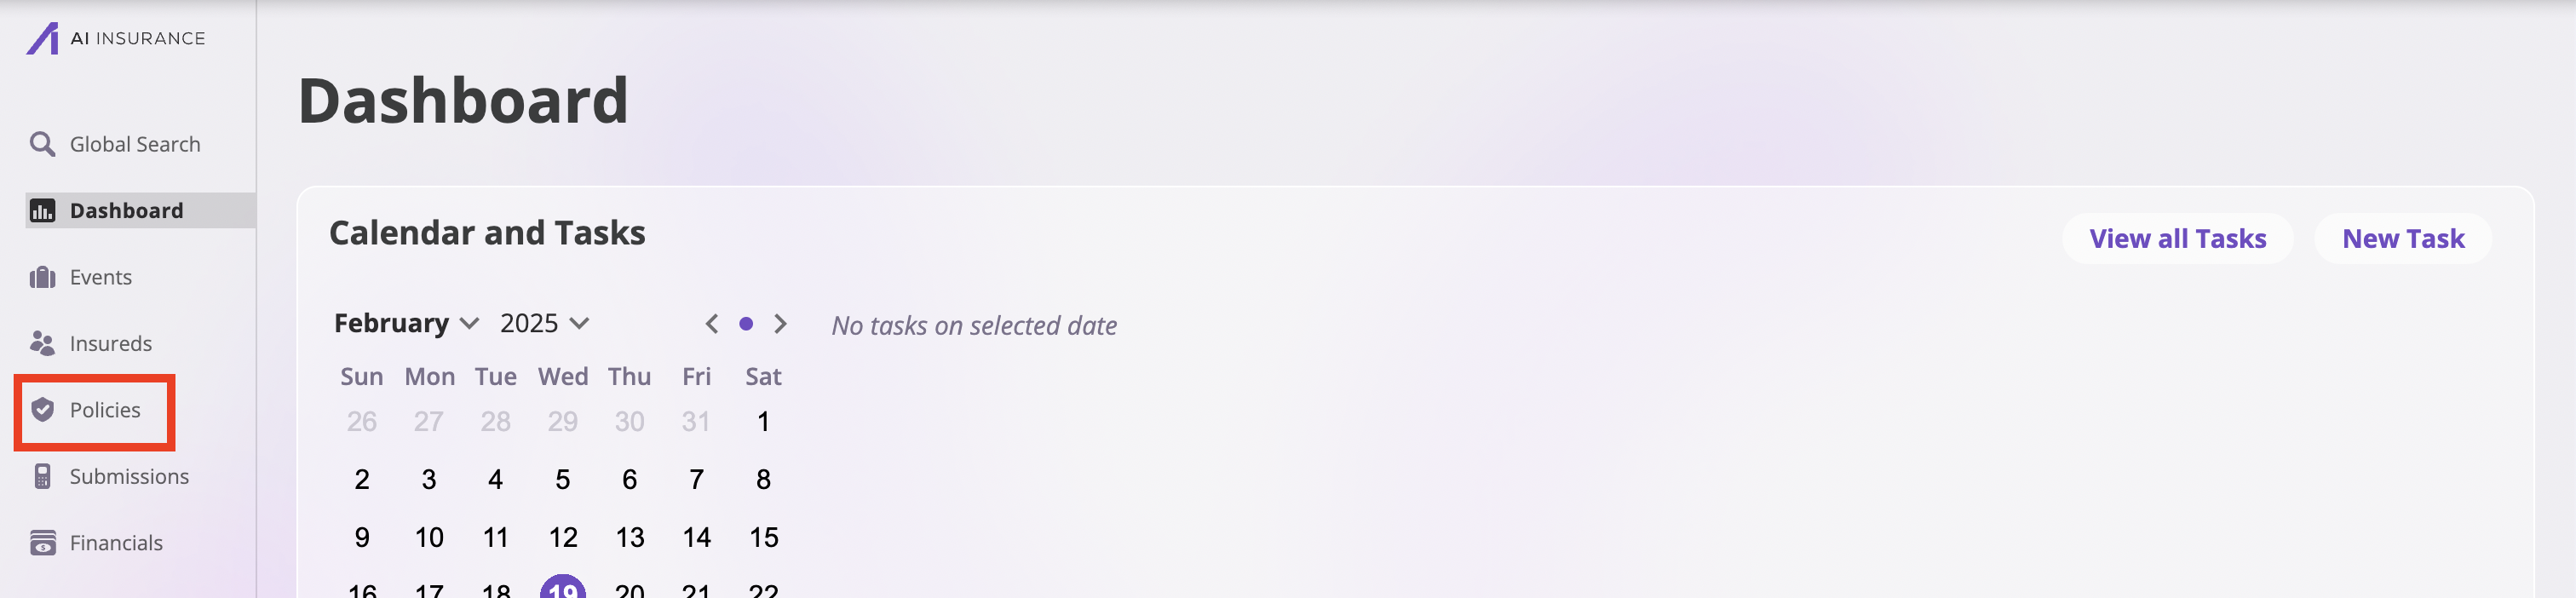
1. Click the **Policies** tab in the sidebar to open the Policies page.
 ## Step 2: Find and Select the Policy
1. Use the search functionality or browse through the list to find the policy you want to endorse.
2. Click on the policy to open its details page.
## Step 3: Start the Endorsement Process
1. On the policy details page, locate the **Actions** dropdown in the top-right corner.
2. Click the **Actions** dropdown to view available options.
3. Select **Endorse Policy** from the dropdown menu.
## Step 2: Find and Select the Policy
1. Use the search functionality or browse through the list to find the policy you want to endorse.
2. Click on the policy to open its details page.
## Step 3: Start the Endorsement Process
1. On the policy details page, locate the **Actions** dropdown in the top-right corner.
2. Click the **Actions** dropdown to view available options.
3. Select **Endorse Policy** from the dropdown menu.
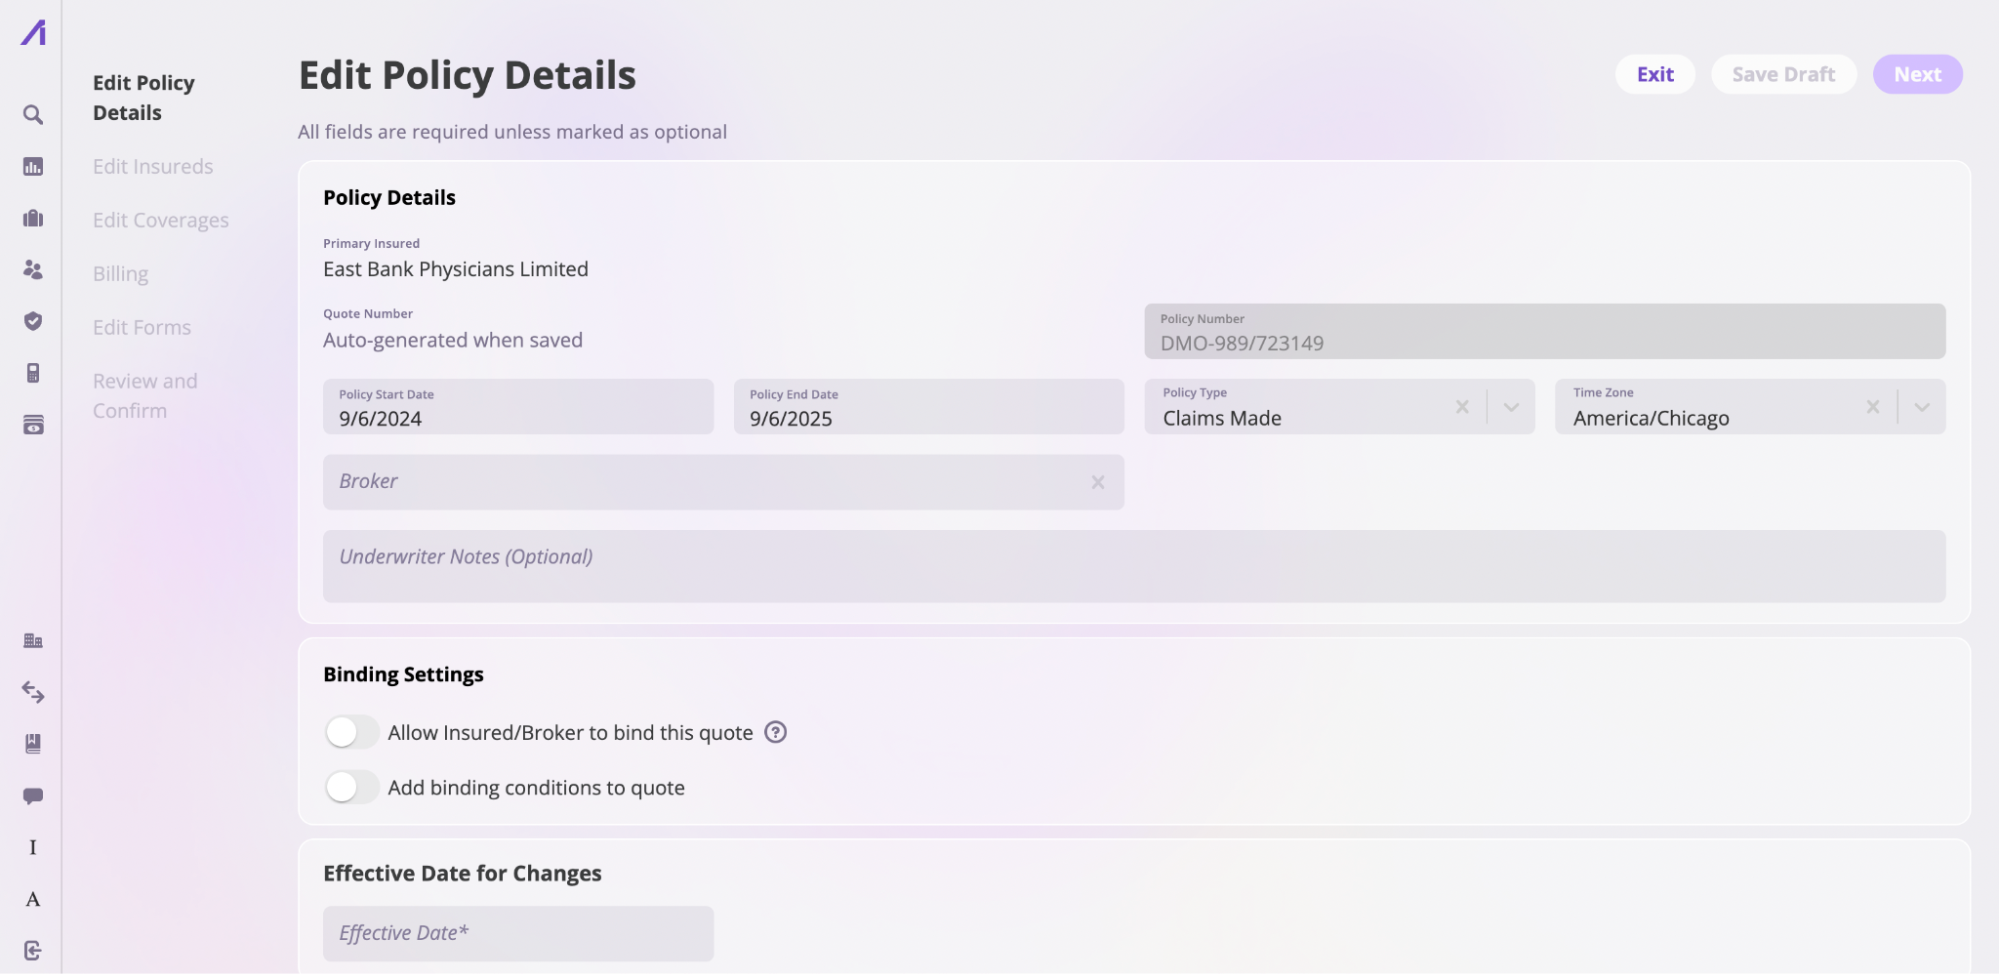
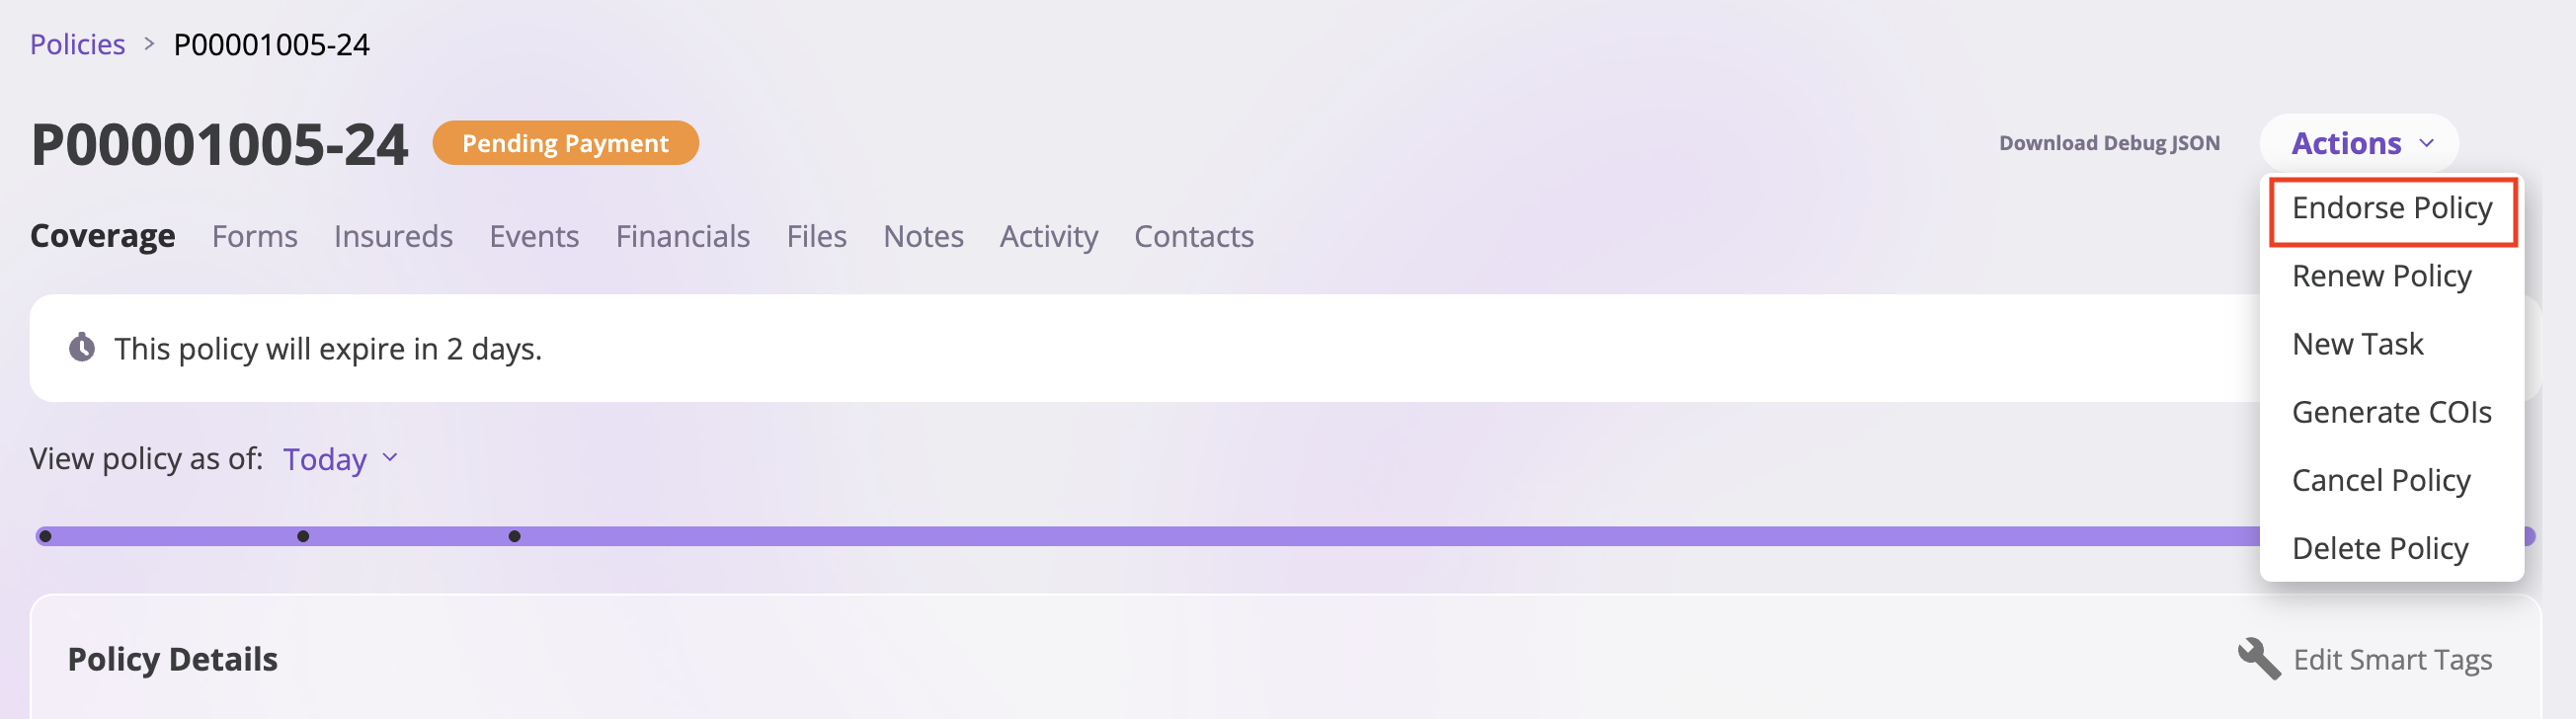 This will open the **Endorse Policy Details** page, which is divided into six sections that you'll complete sequentially.
## Step 4: Endorse Policy Details
The first section allows you to update basic policy information.
1. Review and update policy information as needed:
* Start and end dates
* Policy type
* Timezone
* Broker information
* Other policy-level details
2. **Important**: Specify the **Effective Date for Changes**. The **Next** button will remain inactive until you enter this date.
This will open the **Endorse Policy Details** page, which is divided into six sections that you'll complete sequentially.
## Step 4: Endorse Policy Details
The first section allows you to update basic policy information.
1. Review and update policy information as needed:
* Start and end dates
* Policy type
* Timezone
* Broker information
* Other policy-level details
2. **Important**: Specify the **Effective Date for Changes**. The **Next** button will remain inactive until you enter this date.
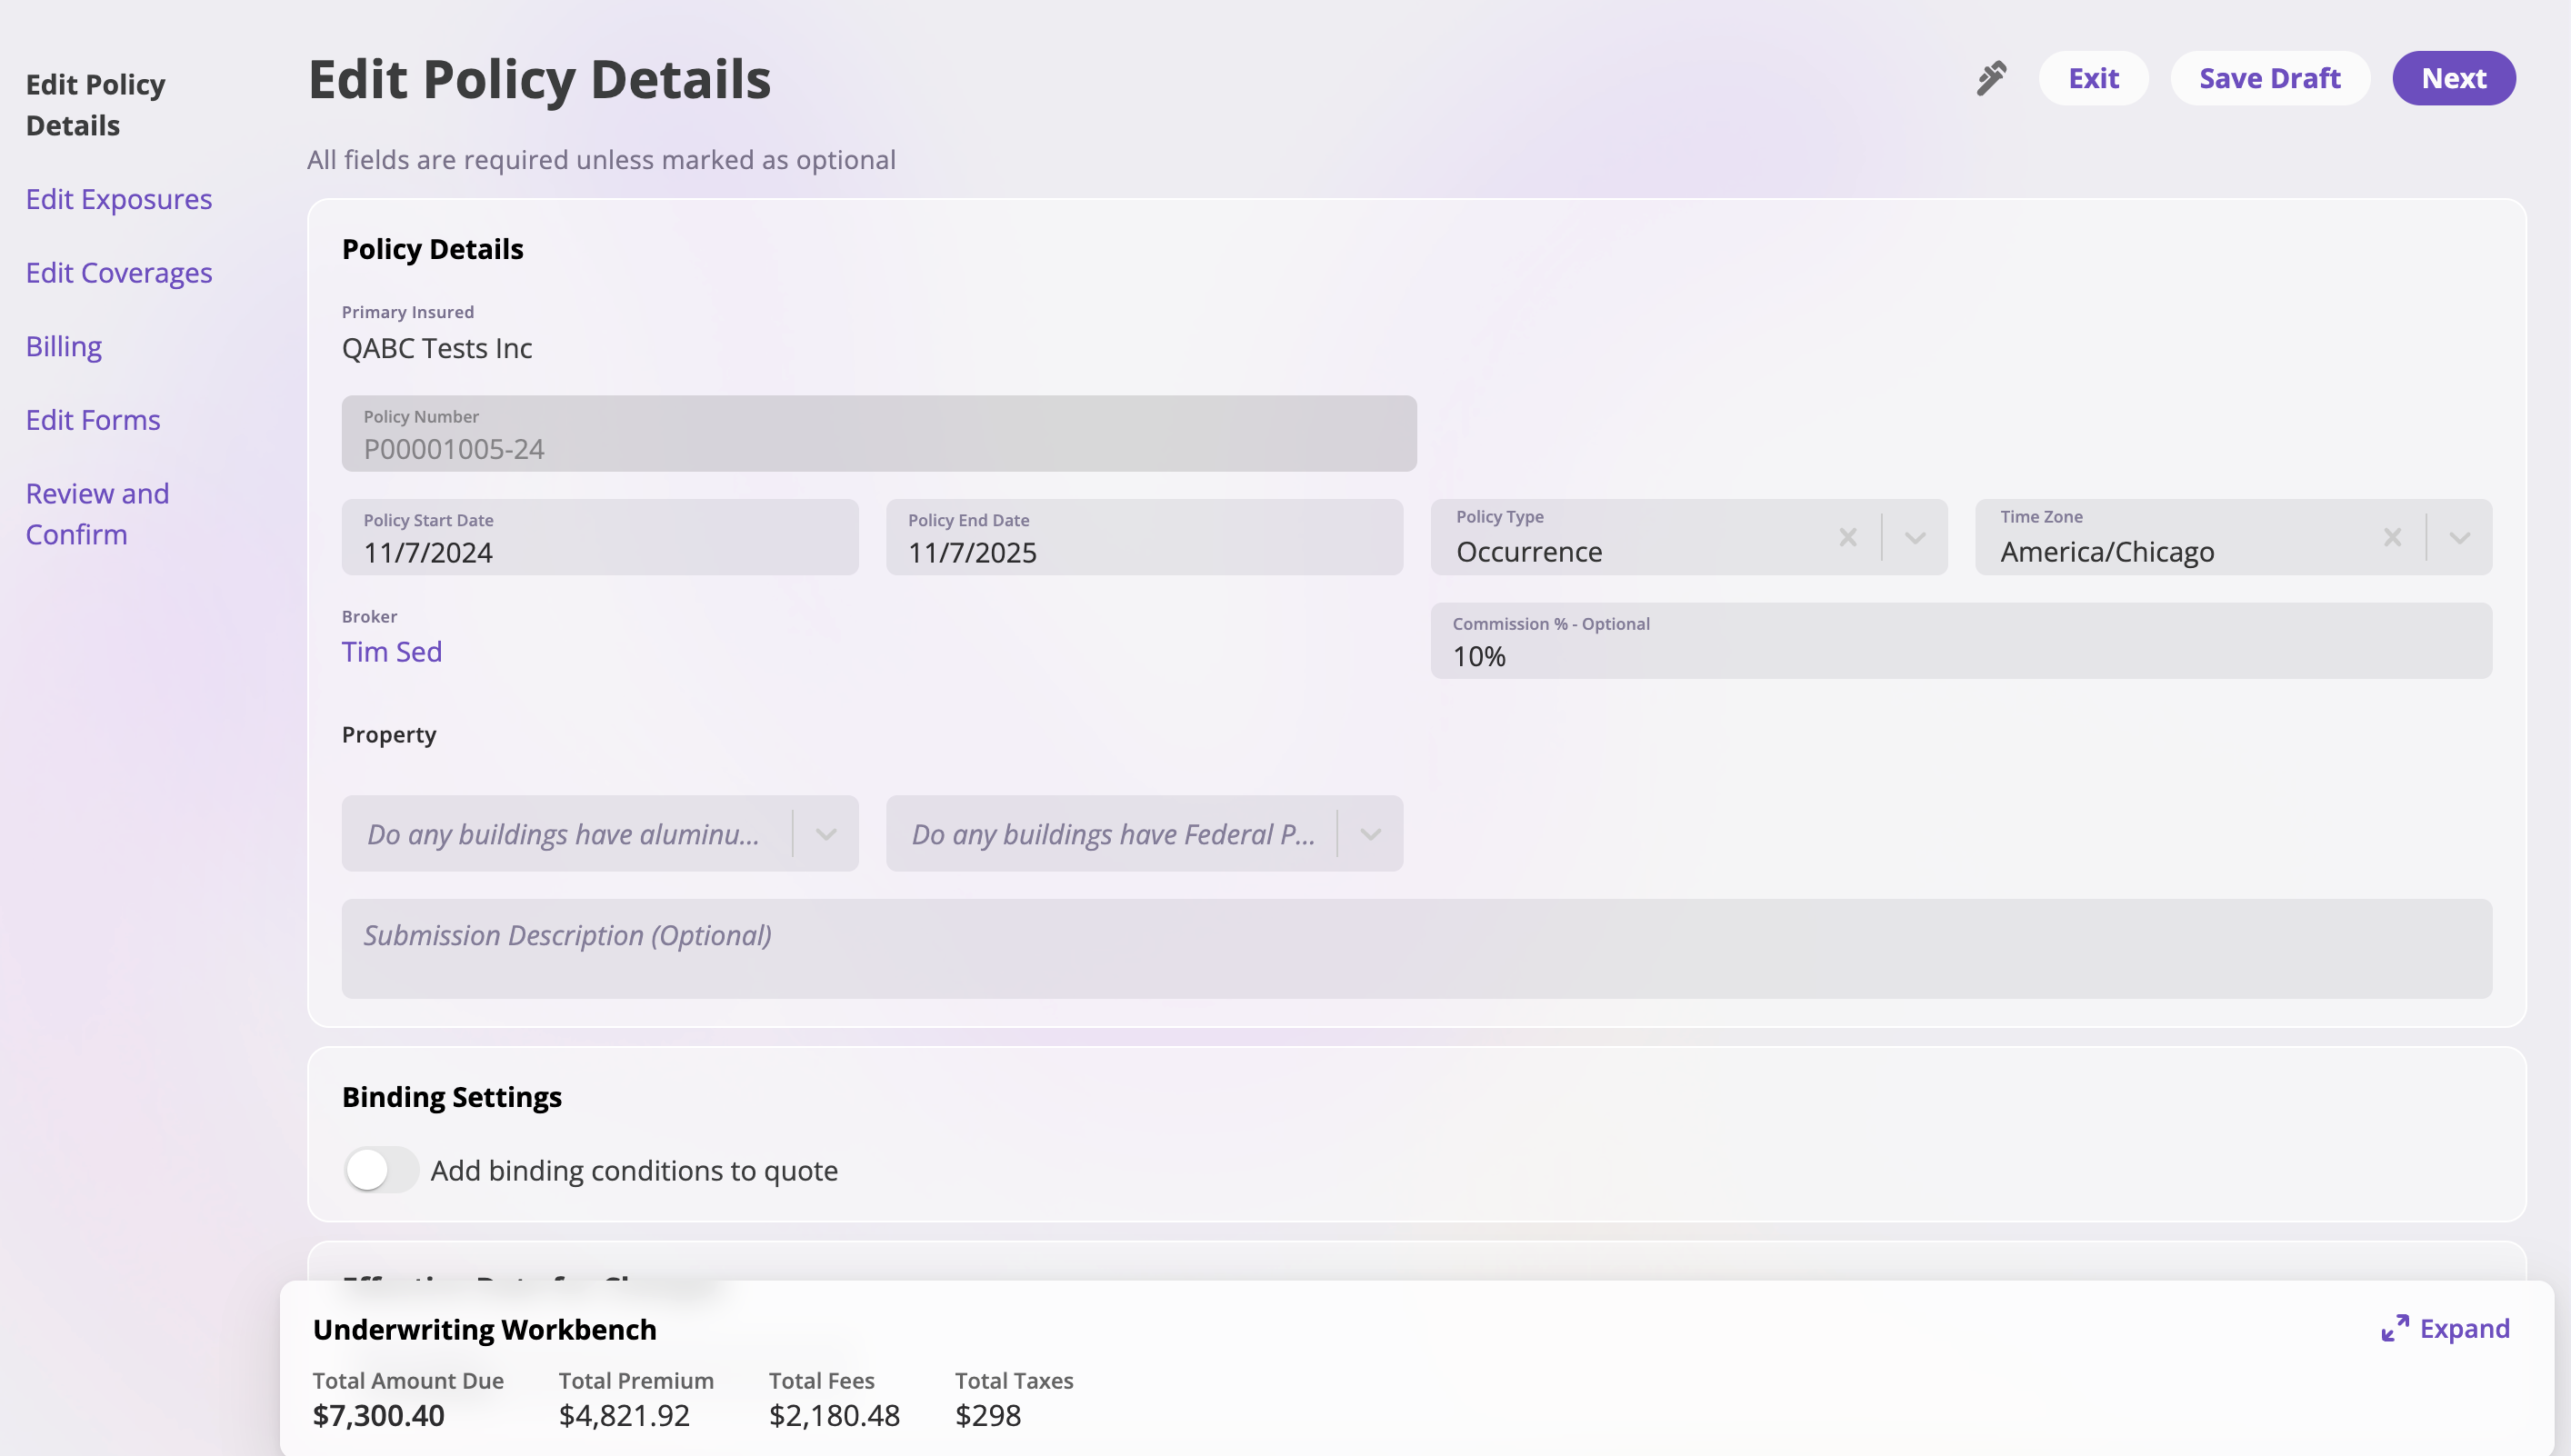 3. Click **Next** to proceed to the next section once you've completed all required fields.
## Step 5: Edit Exposures
In this section, you can manage the exposures (insured parties) associated with the policy.
1. **Add Exposures**: Click the **Add Exposure** button to include new insured parties to the policy.
2. **Edit Exposure Details**: Click the **edit icon** next to an exposure to edit its details. This will open the **Edit Insured** page where you can:
3. Click **Next** to proceed to the next section once you've completed all required fields.
## Step 5: Edit Exposures
In this section, you can manage the exposures (insured parties) associated with the policy.
1. **Add Exposures**: Click the **Add Exposure** button to include new insured parties to the policy.
2. **Edit Exposure Details**: Click the **edit icon** next to an exposure to edit its details. This will open the **Edit Insured** page where you can:
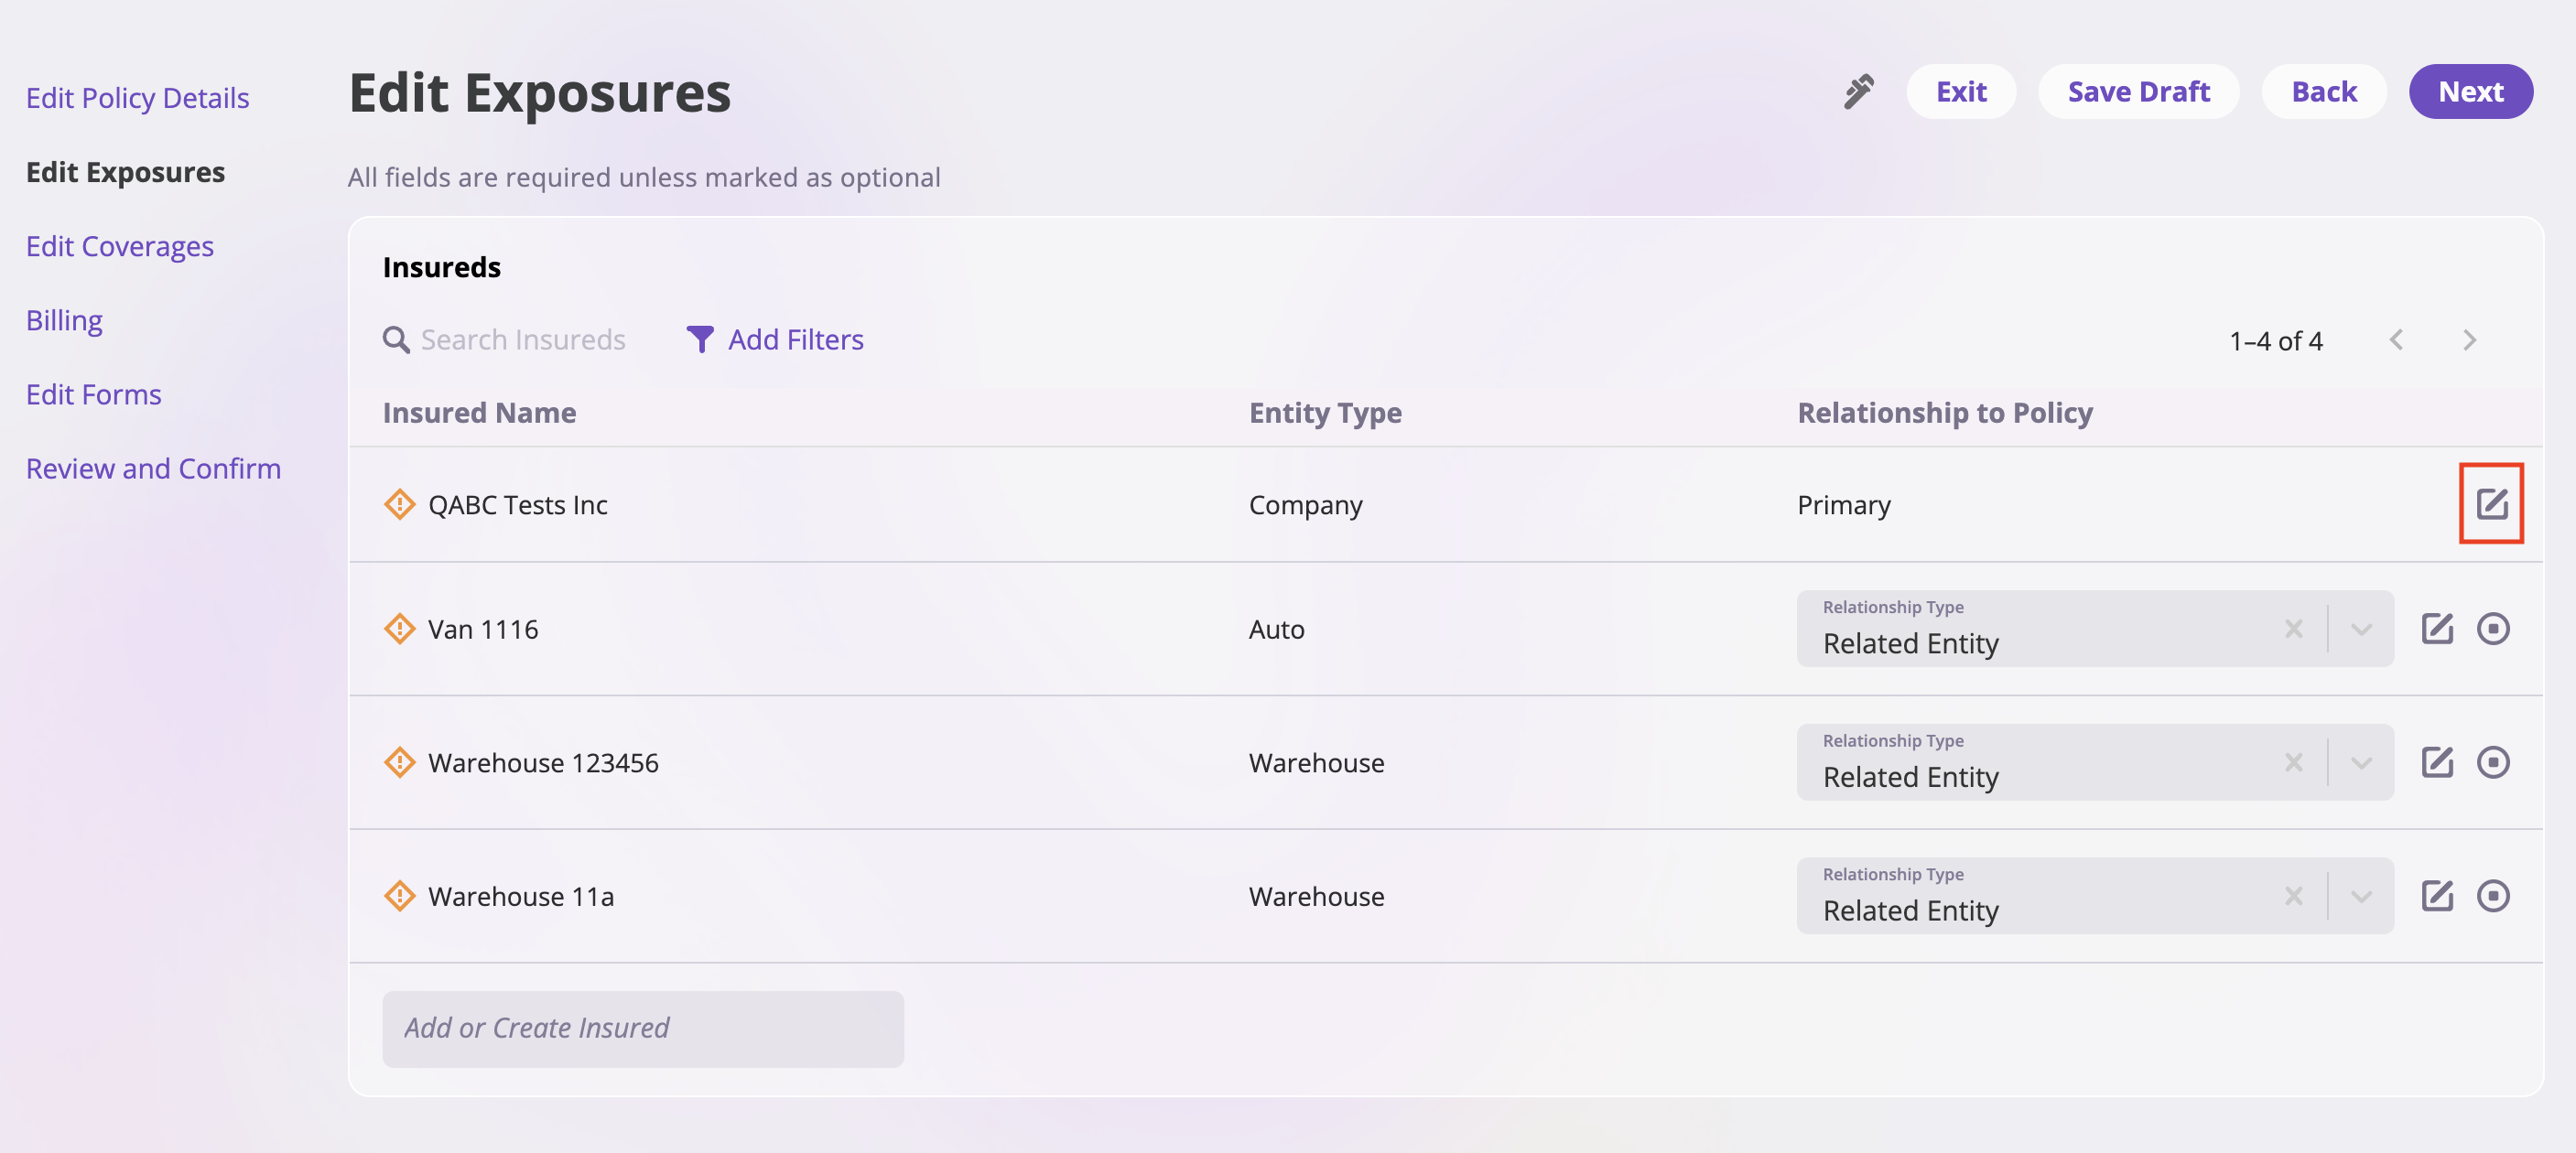 * **Set Effective Date for Changes**: Enter the effective date for the changes (required field, indicated by \*). Note that these edits will only affect the specific policy being endorsed.
* **Rating Information**:
* **Risk Factor**: Enter the risk factor value (required field, indicated by \*)
* **Do Not Rate**: Check the "Do not rate this Insured" checkbox if you want to exclude this exposure from rating calculations
* **Exposure Information**: Update exposure details, relationships, and other exposure-specific attributes
* **Terminate or Resume Exposure Relationship**:
* Click the **pause icon** to terminate an exposure's relationship with the policy
* Click **resume** to restore the exposure's relationship with the policy
* **Set Effective Date for Changes**: Enter the effective date for the changes (required field, indicated by \*). Note that these edits will only affect the specific policy being endorsed.
* **Rating Information**:
* **Risk Factor**: Enter the risk factor value (required field, indicated by \*)
* **Do Not Rate**: Check the "Do not rate this Insured" checkbox if you want to exclude this exposure from rating calculations
* **Exposure Information**: Update exposure details, relationships, and other exposure-specific attributes
* **Terminate or Resume Exposure Relationship**:
* Click the **pause icon** to terminate an exposure's relationship with the policy
* Click **resume** to restore the exposure's relationship with the policy
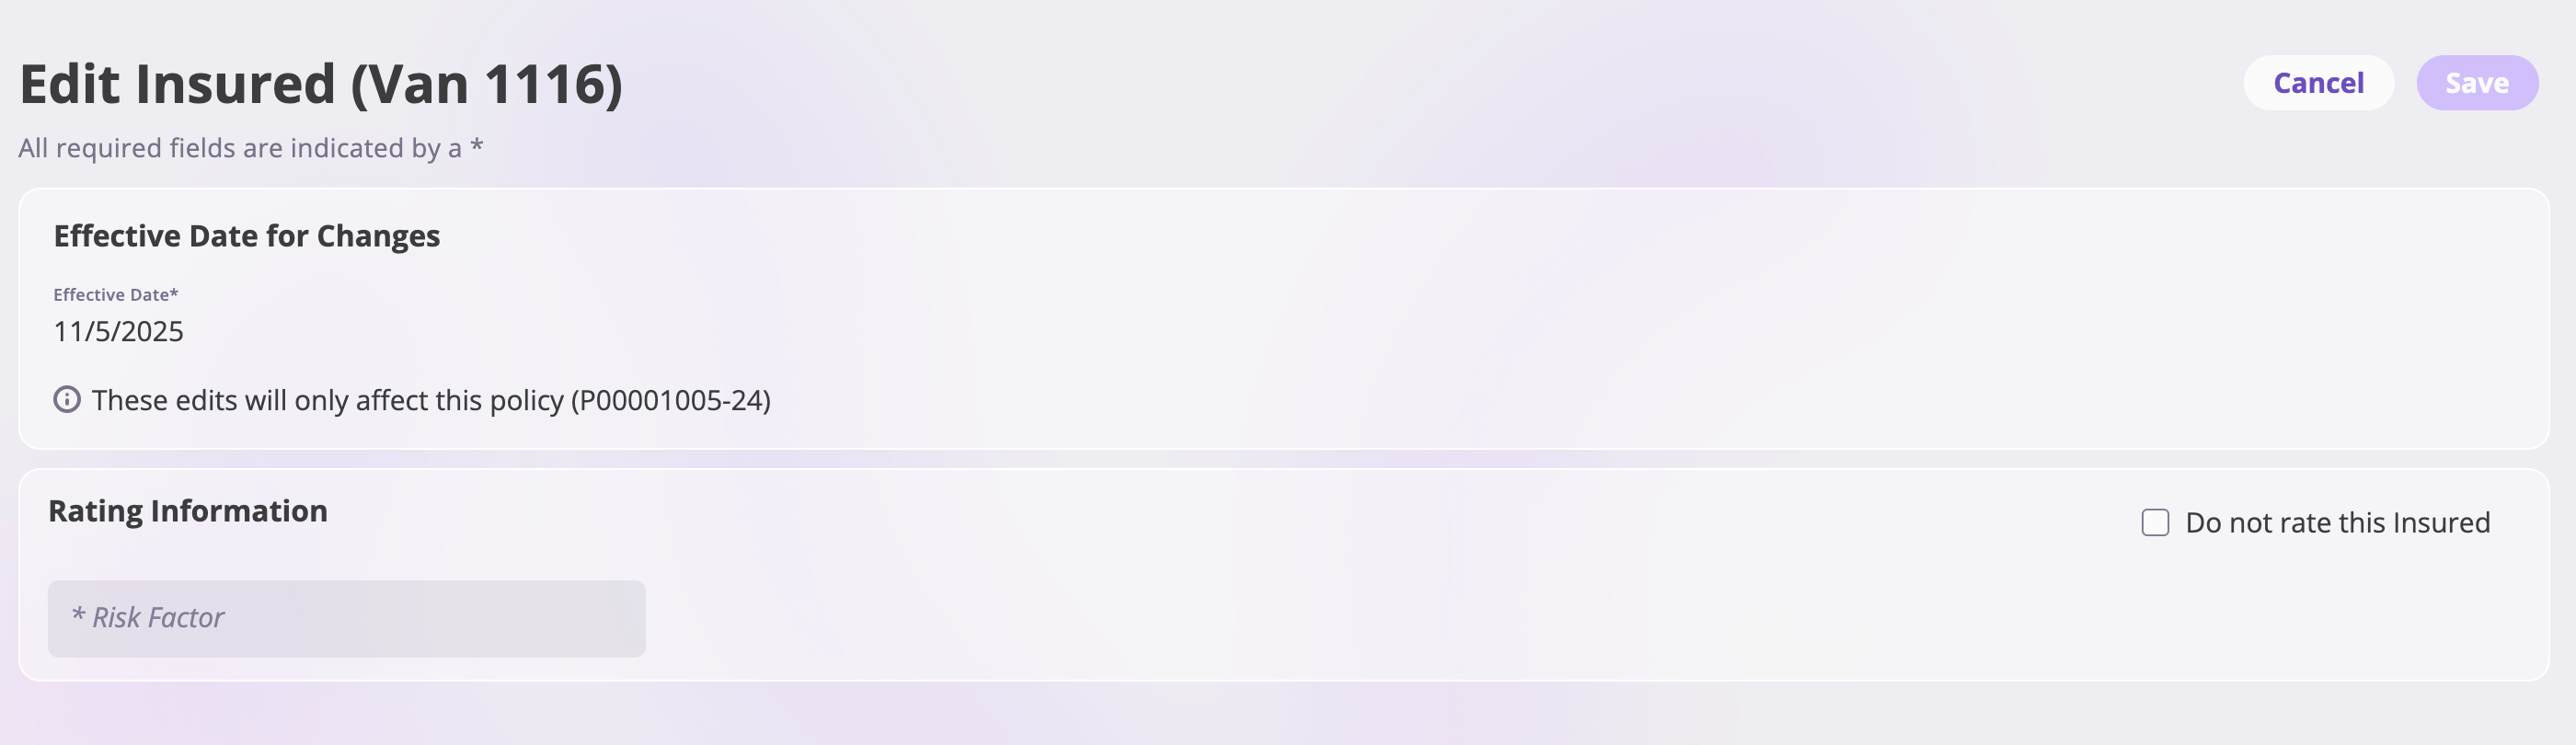 Once you've made your changes, click **Save** to confirm or **Cancel** to discard your changes.
3. Review all exposure changes to ensure accuracy.
4. Click **Next** to proceed.
## Step 6: Edit Coverages
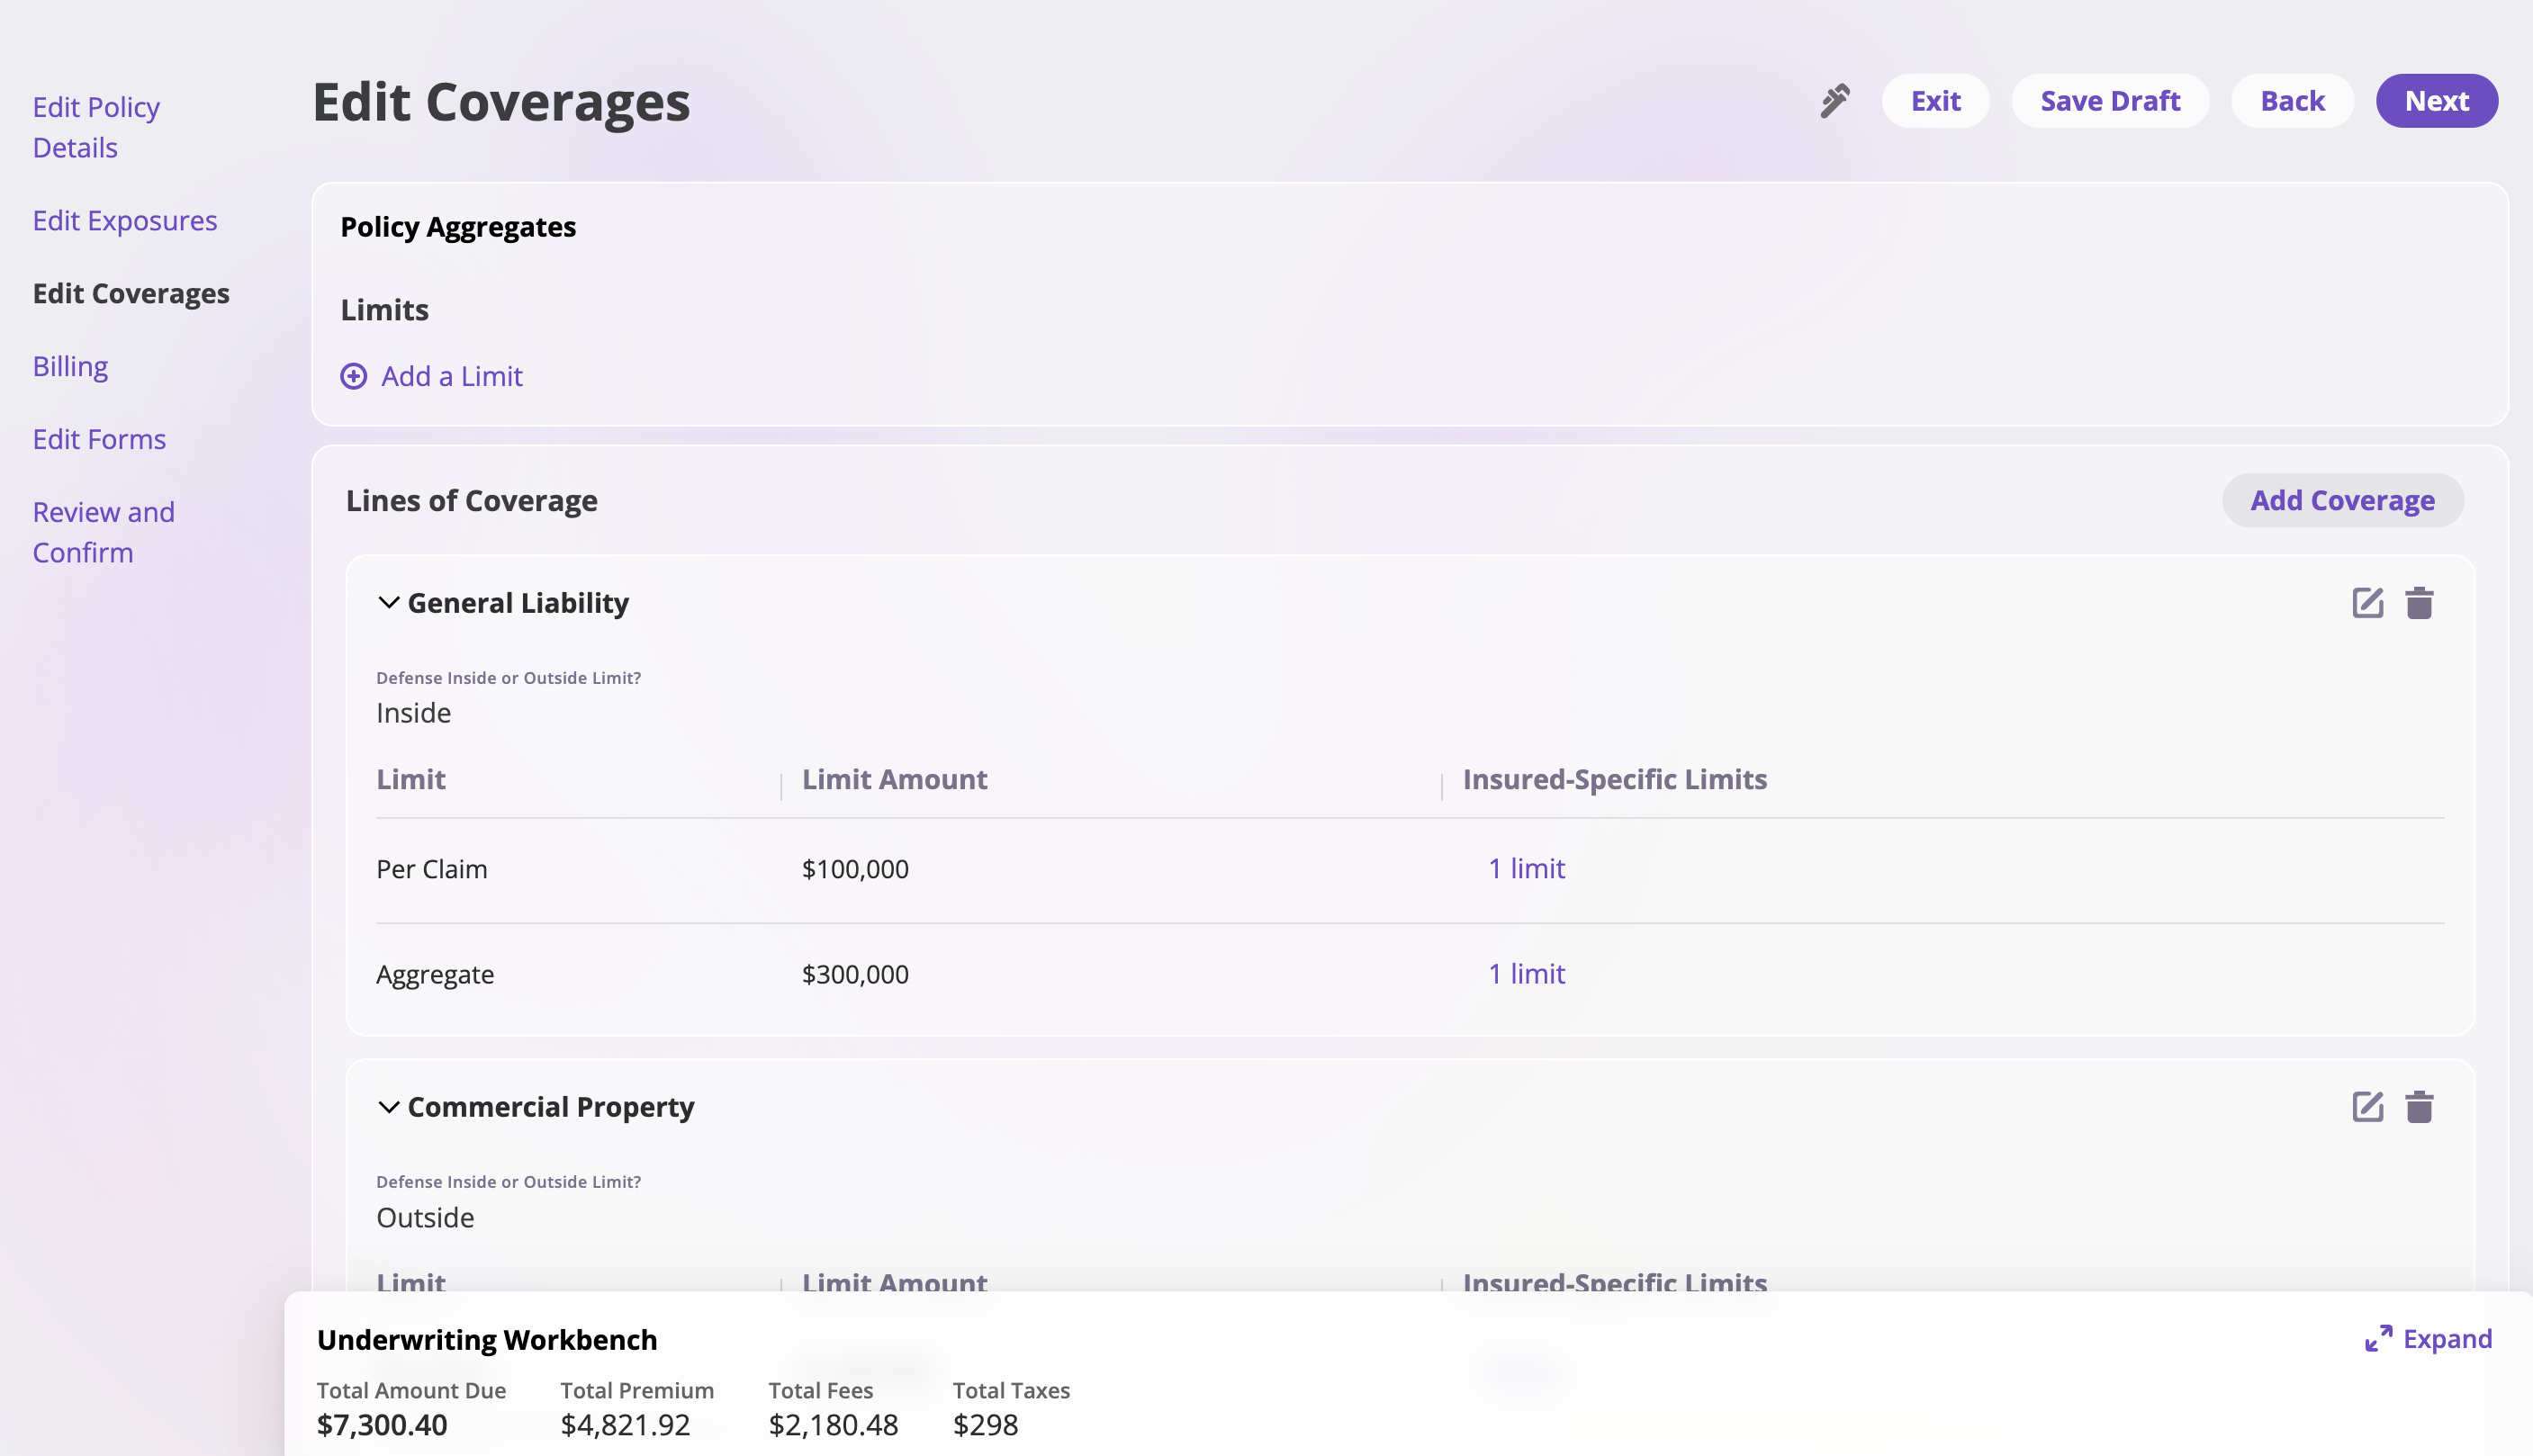
This section allows you to manage coverage lines, limits, and policy aggregates.
Once you've made your changes, click **Save** to confirm or **Cancel** to discard your changes.
3. Review all exposure changes to ensure accuracy.
4. Click **Next** to proceed.
## Step 6: Edit Coverages
This section allows you to manage coverage lines, limits, and policy aggregates.
 ### Policy Aggregates
1. **Manage Limits**: In the **Policy Aggregates** section, you can:
* View existing limits configured for the policy
* Click **Add a Limit** to create new policy-level limits
### Lines of Coverage
2. **Add Coverage Lines**:
* Click the **Add Coverage** button to include new coverage lines (e.g., General Liability, Commercial Property) to the policy
3. **Edit Coverage Details**: Click the **edit icon** next to a coverage line to open the **Edit Coverage** page. On this page, you can configure:
* **Line of Coverage**: Select or view the coverage type (e.g., General Liability, Commercial Property)
* **Preset**: Choose from preset coverage configurations (e.g., "$100K/$300K") if available
* **Defense Limits**: Select whether defense is "Inside" or "Outside" the limit using the radio buttons
* **Limits**:
* **Per Claim Limit**: Set the maximum amount per individual claim (e.g., \$100,000)
* **Aggregate Limit**: Set the total maximum amount for all claims (e.g., \$300,000)
* **Insured-Specific Limits**: Check "Use separate limits for specific insureds" to configure limits for specific exposures. Click **View/Edit** to manage these limits.
* **Deductibles**: Check "Add Deductible to this Line of Coverage" to add a deductible requirement
* **Retroactive Dates**:
* Set a retroactive date if applicable
* Optionally check "Use separate retroactive dates for specific insureds" to set different dates per exposure
* **Prior and Pending Litigation Dates**: Enter a prior or pending litigation date if required
Once you've made your changes, click **Save** to confirm or **Cancel** to discard your changes.
4. **Remove Coverage Lines**: Click the **delete icon** next to a coverage line to remove it from the policy
**Note**: To change coverage limits, see the [Changing Coverage Limits](/policing/policy-management/changing-coverage-limits) documentation.
6. Review all coverage changes to ensure accuracy.
7. Click **Next** to proceed.
## Step 7: Billing
The Billing page displays a summary of all financial changes resulting from the endorsement.
1. **Review Financial Changes**: The billing table shows:
* **Item Name**: The name of each financial item
* **Old Value**: The original amount before the endorsement
* **Change in Value**: The difference in amount (can be positive or negative)
* **New Value**: The updated amount after the endorsement
* **Item Type**: The category of each item
### Policy Aggregates
1. **Manage Limits**: In the **Policy Aggregates** section, you can:
* View existing limits configured for the policy
* Click **Add a Limit** to create new policy-level limits
### Lines of Coverage
2. **Add Coverage Lines**:
* Click the **Add Coverage** button to include new coverage lines (e.g., General Liability, Commercial Property) to the policy
3. **Edit Coverage Details**: Click the **edit icon** next to a coverage line to open the **Edit Coverage** page. On this page, you can configure:
* **Line of Coverage**: Select or view the coverage type (e.g., General Liability, Commercial Property)
* **Preset**: Choose from preset coverage configurations (e.g., "$100K/$300K") if available
* **Defense Limits**: Select whether defense is "Inside" or "Outside" the limit using the radio buttons
* **Limits**:
* **Per Claim Limit**: Set the maximum amount per individual claim (e.g., \$100,000)
* **Aggregate Limit**: Set the total maximum amount for all claims (e.g., \$300,000)
* **Insured-Specific Limits**: Check "Use separate limits for specific insureds" to configure limits for specific exposures. Click **View/Edit** to manage these limits.
* **Deductibles**: Check "Add Deductible to this Line of Coverage" to add a deductible requirement
* **Retroactive Dates**:
* Set a retroactive date if applicable
* Optionally check "Use separate retroactive dates for specific insureds" to set different dates per exposure
* **Prior and Pending Litigation Dates**: Enter a prior or pending litigation date if required
Once you've made your changes, click **Save** to confirm or **Cancel** to discard your changes.
4. **Remove Coverage Lines**: Click the **delete icon** next to a coverage line to remove it from the policy
**Note**: To change coverage limits, see the [Changing Coverage Limits](/policing/policy-management/changing-coverage-limits) documentation.
6. Review all coverage changes to ensure accuracy.
7. Click **Next** to proceed.
## Step 7: Billing
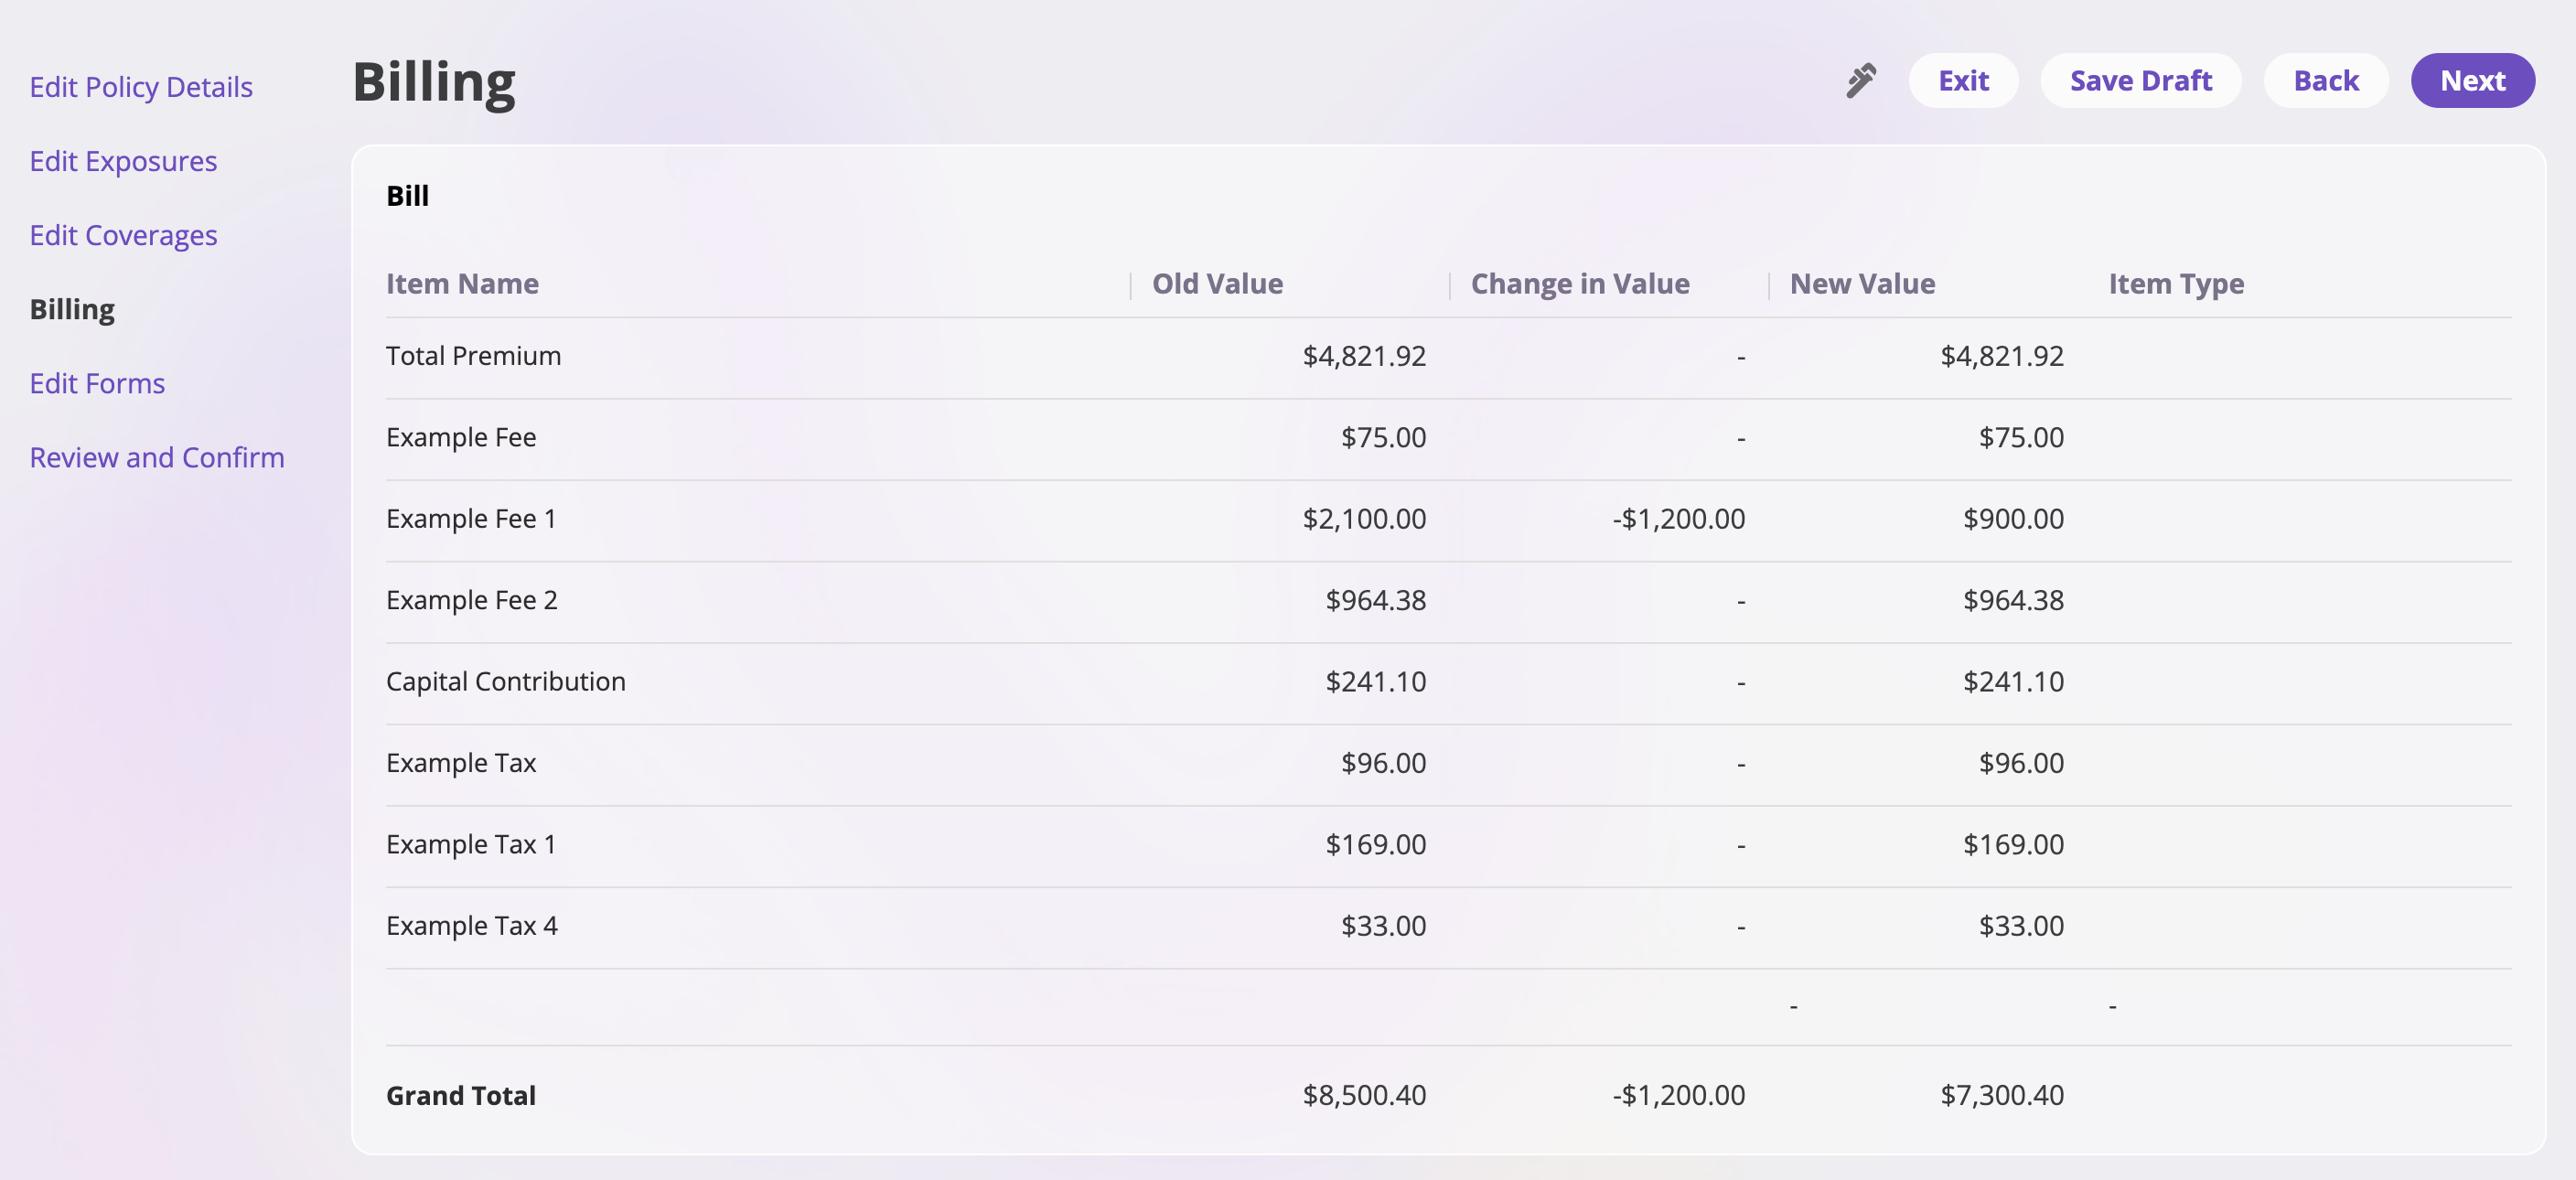
The Billing page displays a summary of all financial changes resulting from the endorsement.
1. **Review Financial Changes**: The billing table shows:
* **Item Name**: The name of each financial item
* **Old Value**: The original amount before the endorsement
* **Change in Value**: The difference in amount (can be positive or negative)
* **New Value**: The updated amount after the endorsement
* **Item Type**: The category of each item
 2. Click **Next** to proceed.
## Step 8: Edit Forms
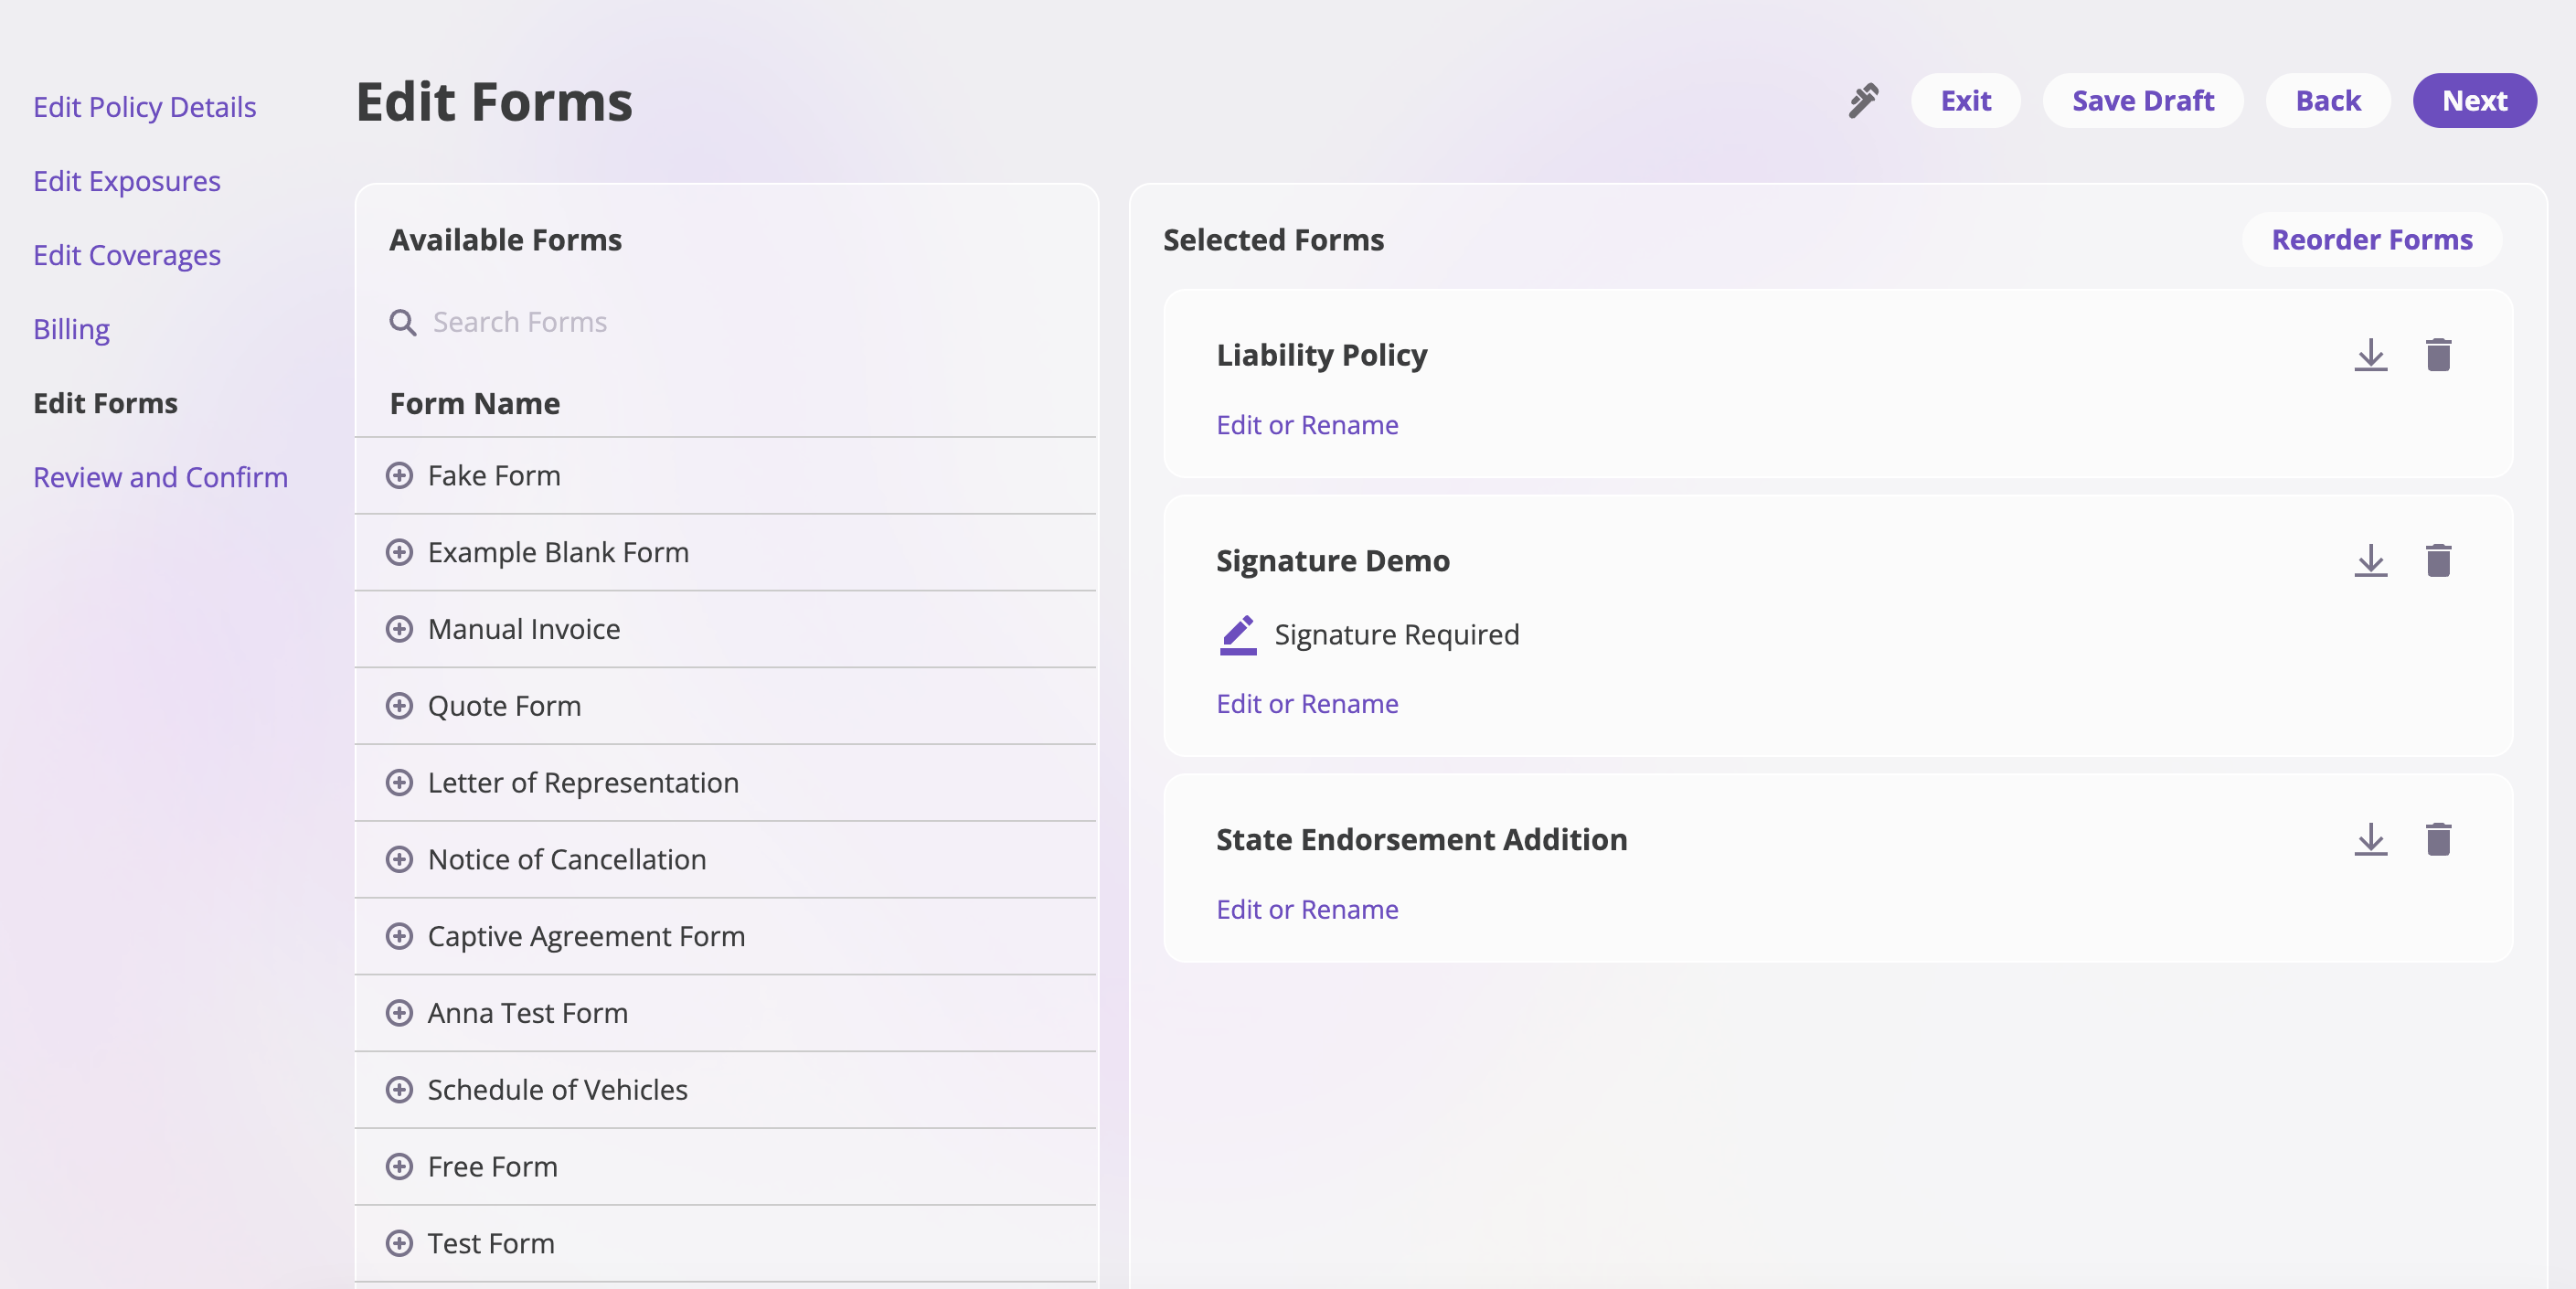
Manage the forms attached to the policy during the endorsement.
1. **Add Forms**: Click **Add Form** to attach new forms to the policy.
2. **Remove Forms**: Select a form and click **Remove** to detach it from the policy.
3. Review the forms list to ensure all necessary forms are included.
4. Click **Next** to proceed.
2. Click **Next** to proceed.
## Step 8: Edit Forms
Manage the forms attached to the policy during the endorsement.
1. **Add Forms**: Click **Add Form** to attach new forms to the policy.
2. **Remove Forms**: Select a form and click **Remove** to detach it from the policy.
3. Review the forms list to ensure all necessary forms are included.
4. Click **Next** to proceed.
 ## Step 9: Review and Confirm
The final section allows you to review all changes before confirming the endorsement.
1. **Review Changes**: Carefully review all modifications you've made across:
* Policy details
* Exposures
* Coverages
* Billing and financial changes
* Forms
2. **Confirm Endorsement**: When you're ready to finalize the endorsement:
* Click the **Confirm Endorsement** button.
* The **Confirm Endorsement** modal will appear.
3. **Enter Recipient Information**: In the modal:
* Input the primary recipient's email address.
* Optionally, add additional email addresses for other recipients who should receive notification of the endorsement.
4. Click **Confirm** to complete the endorsement process.
## Step 9: Review and Confirm
The final section allows you to review all changes before confirming the endorsement.
1. **Review Changes**: Carefully review all modifications you've made across:
* Policy details
* Exposures
* Coverages
* Billing and financial changes
* Forms
2. **Confirm Endorsement**: When you're ready to finalize the endorsement:
* Click the **Confirm Endorsement** button.
* The **Confirm Endorsement** modal will appear.
3. **Enter Recipient Information**: In the modal:
* Input the primary recipient's email address.
* Optionally, add additional email addresses for other recipients who should receive notification of the endorsement.
4. Click **Confirm** to complete the endorsement process.
 ## What Happens Next?
After confirming the endorsement:
* The policy will be updated with all your changes.
* Email notifications will be sent to the specified recipients.
* The endorsement will be recorded in the policy's activity history.
* You can view the updated policy details in the Policies section.
***
By following these steps, you can successfully update an existing policy to reflect any required changes through the endorsement process.
## What Happens Next?
After confirming the endorsement:
* The policy will be updated with all your changes.
* Email notifications will be sent to the specified recipients.
* The endorsement will be recorded in the policy's activity history.
* You can view the updated policy details in the Policies section.
***
By following these steps, you can successfully update an existing policy to reflect any required changes through the endorsement process.