> ## Documentation Index
> Fetch the complete documentation index at: https://docs.aiinsurance.io/llms.txt
> Use this file to discover all available pages before exploring further.
# How to Add Field Data Model
To ensure your data integrates smoothly with our platform, we need to understand how your existing fields align with our data model.
### What is Field Mapping?
When creating objects such as [Policies](/policing/policy-management/policy-issuance), [Events](/events/create-new-events), or [Insureds](/insureds/creating-insureds) on the AI Insurance platform, you must gather data specific to each object. To simplify this process, the platform provides hundreds of preset data fields to help you collect, store, organize, and retrieve information effectively.
Field mapping is the process of aligning your existing data fields with AI Insurance's data model. This ensures that your current data structure integrates seamlessly with our platform's configuration.
### Why is Field Mapping Important?
Many fields in the AI Insurance platform are **configurable**, meaning we can customize them to match your specific business needs and data requirements. By mapping your existing fields to our data model, we can:
* Accurately configure your system to match your workflows
* Ensure data consistency across all objects
* Reduce onboarding delays
* Maintain data integrity when importing historical data
* Optimize your workflows
## Step-by-Step Field Mapping Process
### Step 1: Receive and Review the Field Data Model Form
The first step is to receive the **Field Data Model** form from AI Insurance via Rocketlane. This form contains the standard fields, their locations, and usage in our system.
Once you receive the form, review it to understand the structure and fields available in the AI Insurance platform. You can also reference the original **AI Insurance Fields Data Model** spreadsheet for additional context: [**View Fields Data Model Template**](https://docs.google.com/spreadsheets/d/1bPW5yy74Lnyjd6jYP5yY-X8M2KcBc7mEKxSrLBGZeR4/edit?gid=0#gid=0)
#### Understanding the Spreadsheet Structure
The Field Data Model spreadsheet is organized into multiple tabs, with each tab representing a different section or page in the AI Insurance application. **To add custom fields, add a new row in the appropriate tab and fill in the required columns**. We will use this information to configure your instance to match your specific needs and workflows.
#### Spreadsheet Tabs Explained
This tab contains detailed instructions on how to fill out the spreadsheet. **Be sure to read this tab first** before adding any fields to your spreadsheet. It provides essential guidance on column meanings, data types, and formatting requirements that will help you complete the form accurately.
**Review Only**: This tab is for reference only. Do not fill out or modify this tab.
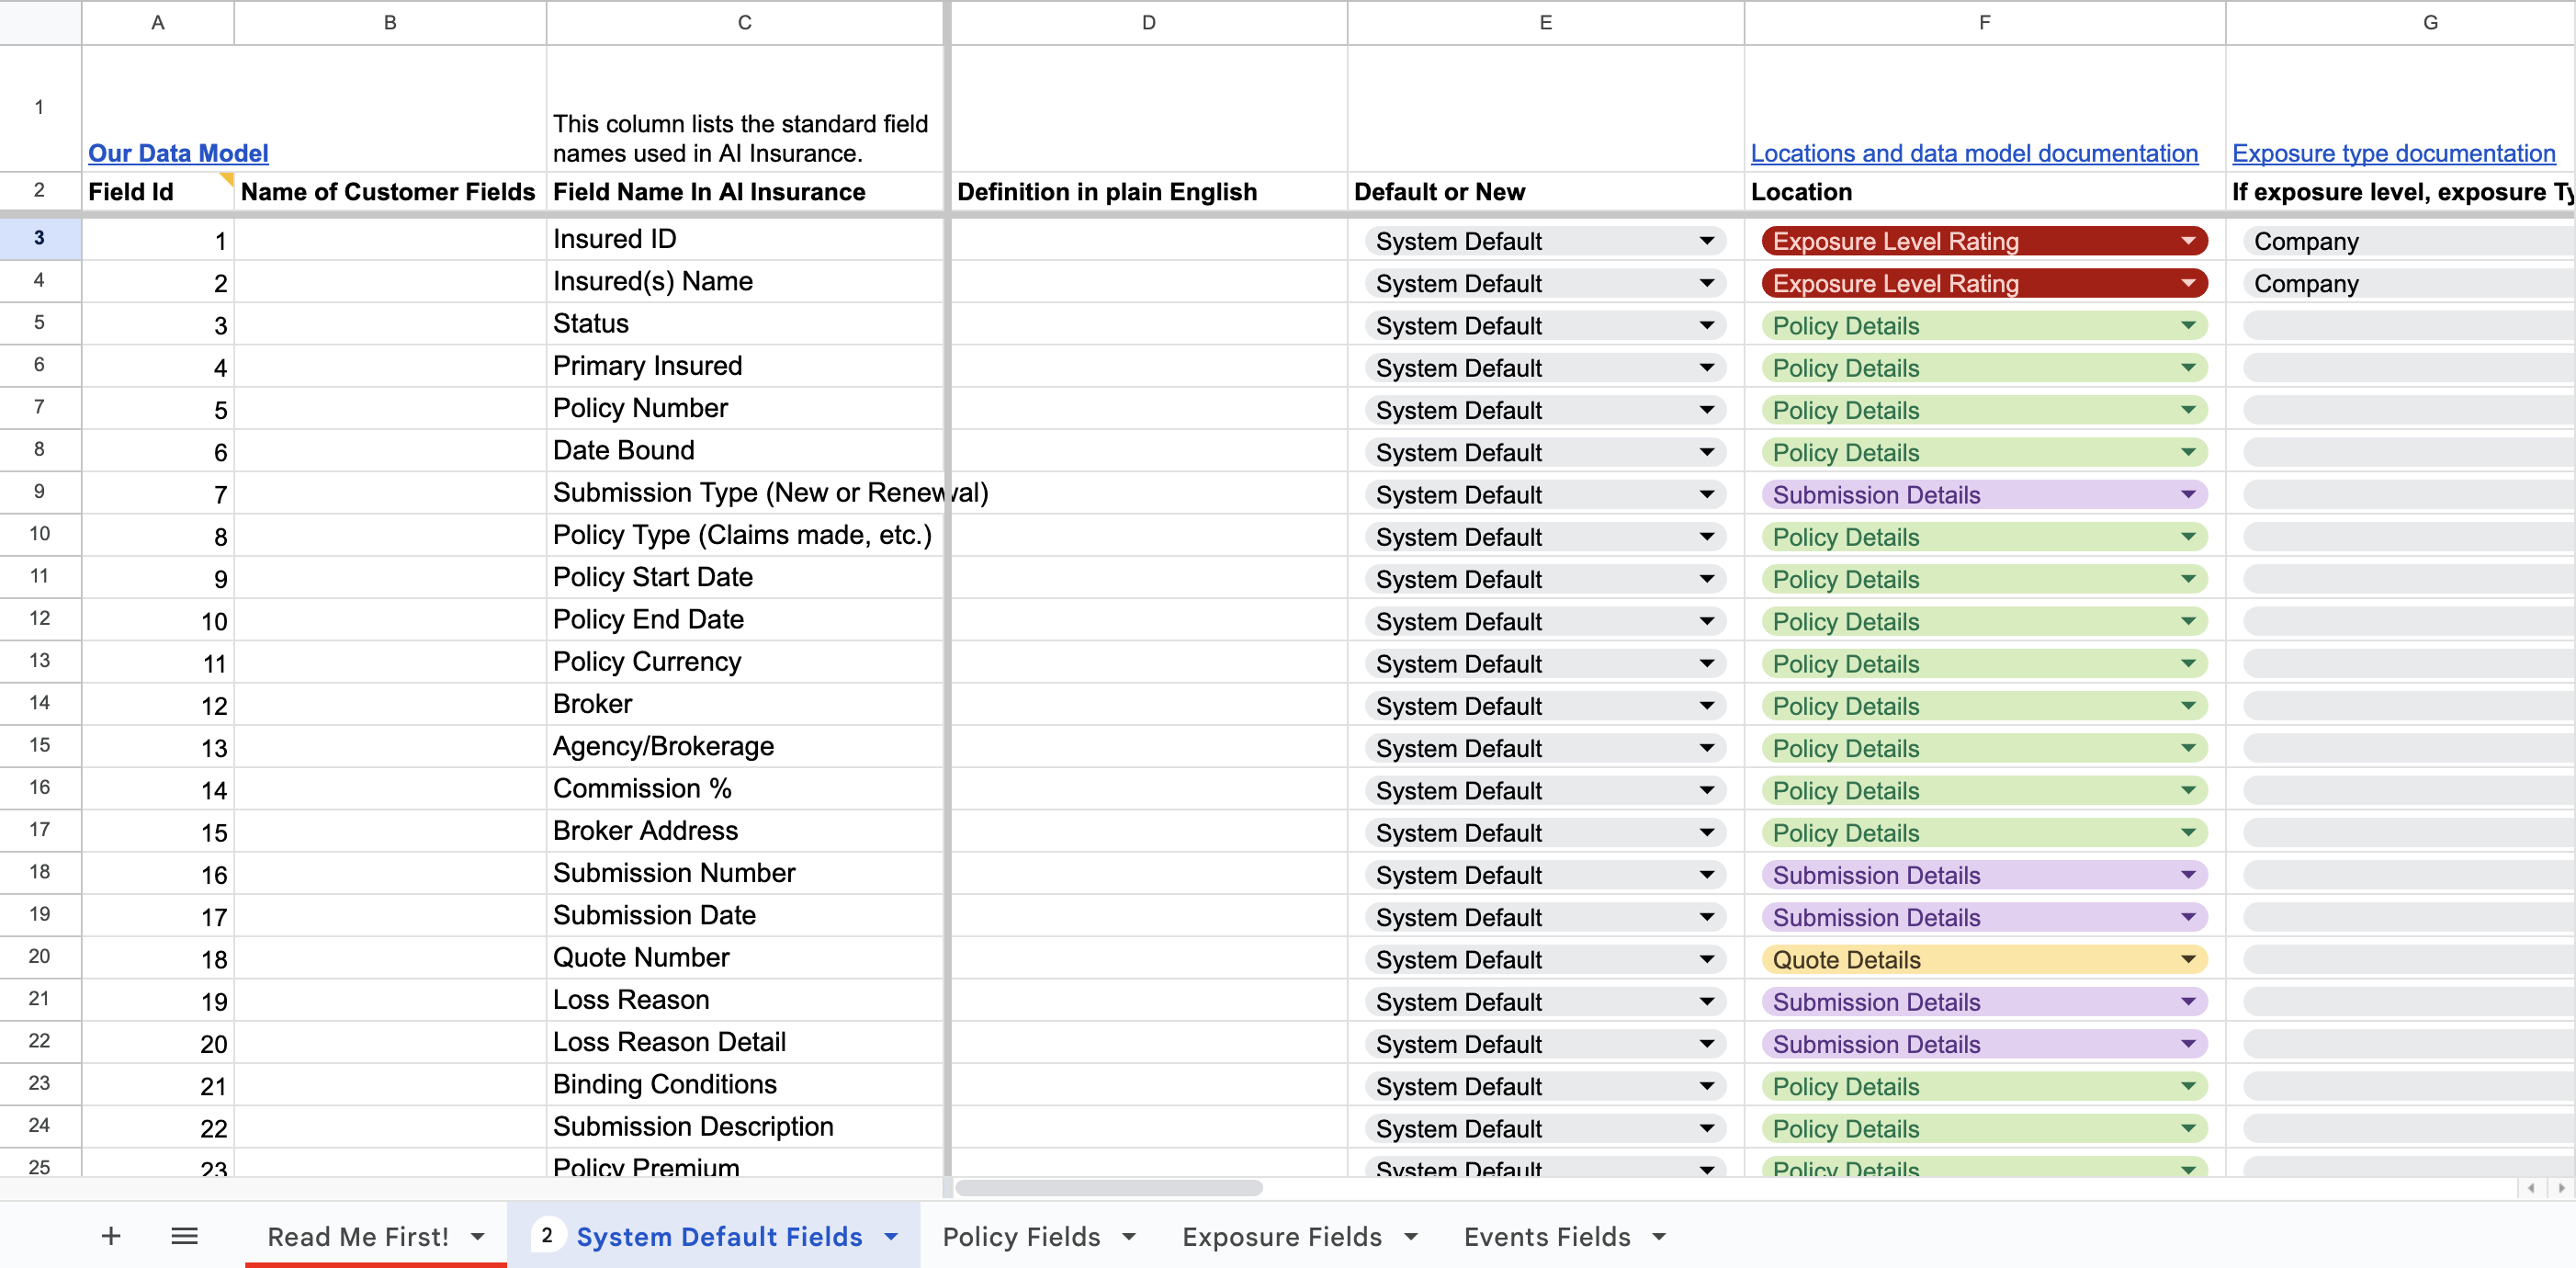
This tab lists all fields that already exist in the AI Insurance platform. **Review this tab carefully** before adding custom fields to see what's already available.
**Important**: Do not add these fields again as custom fields, as this will create duplicates in your application.
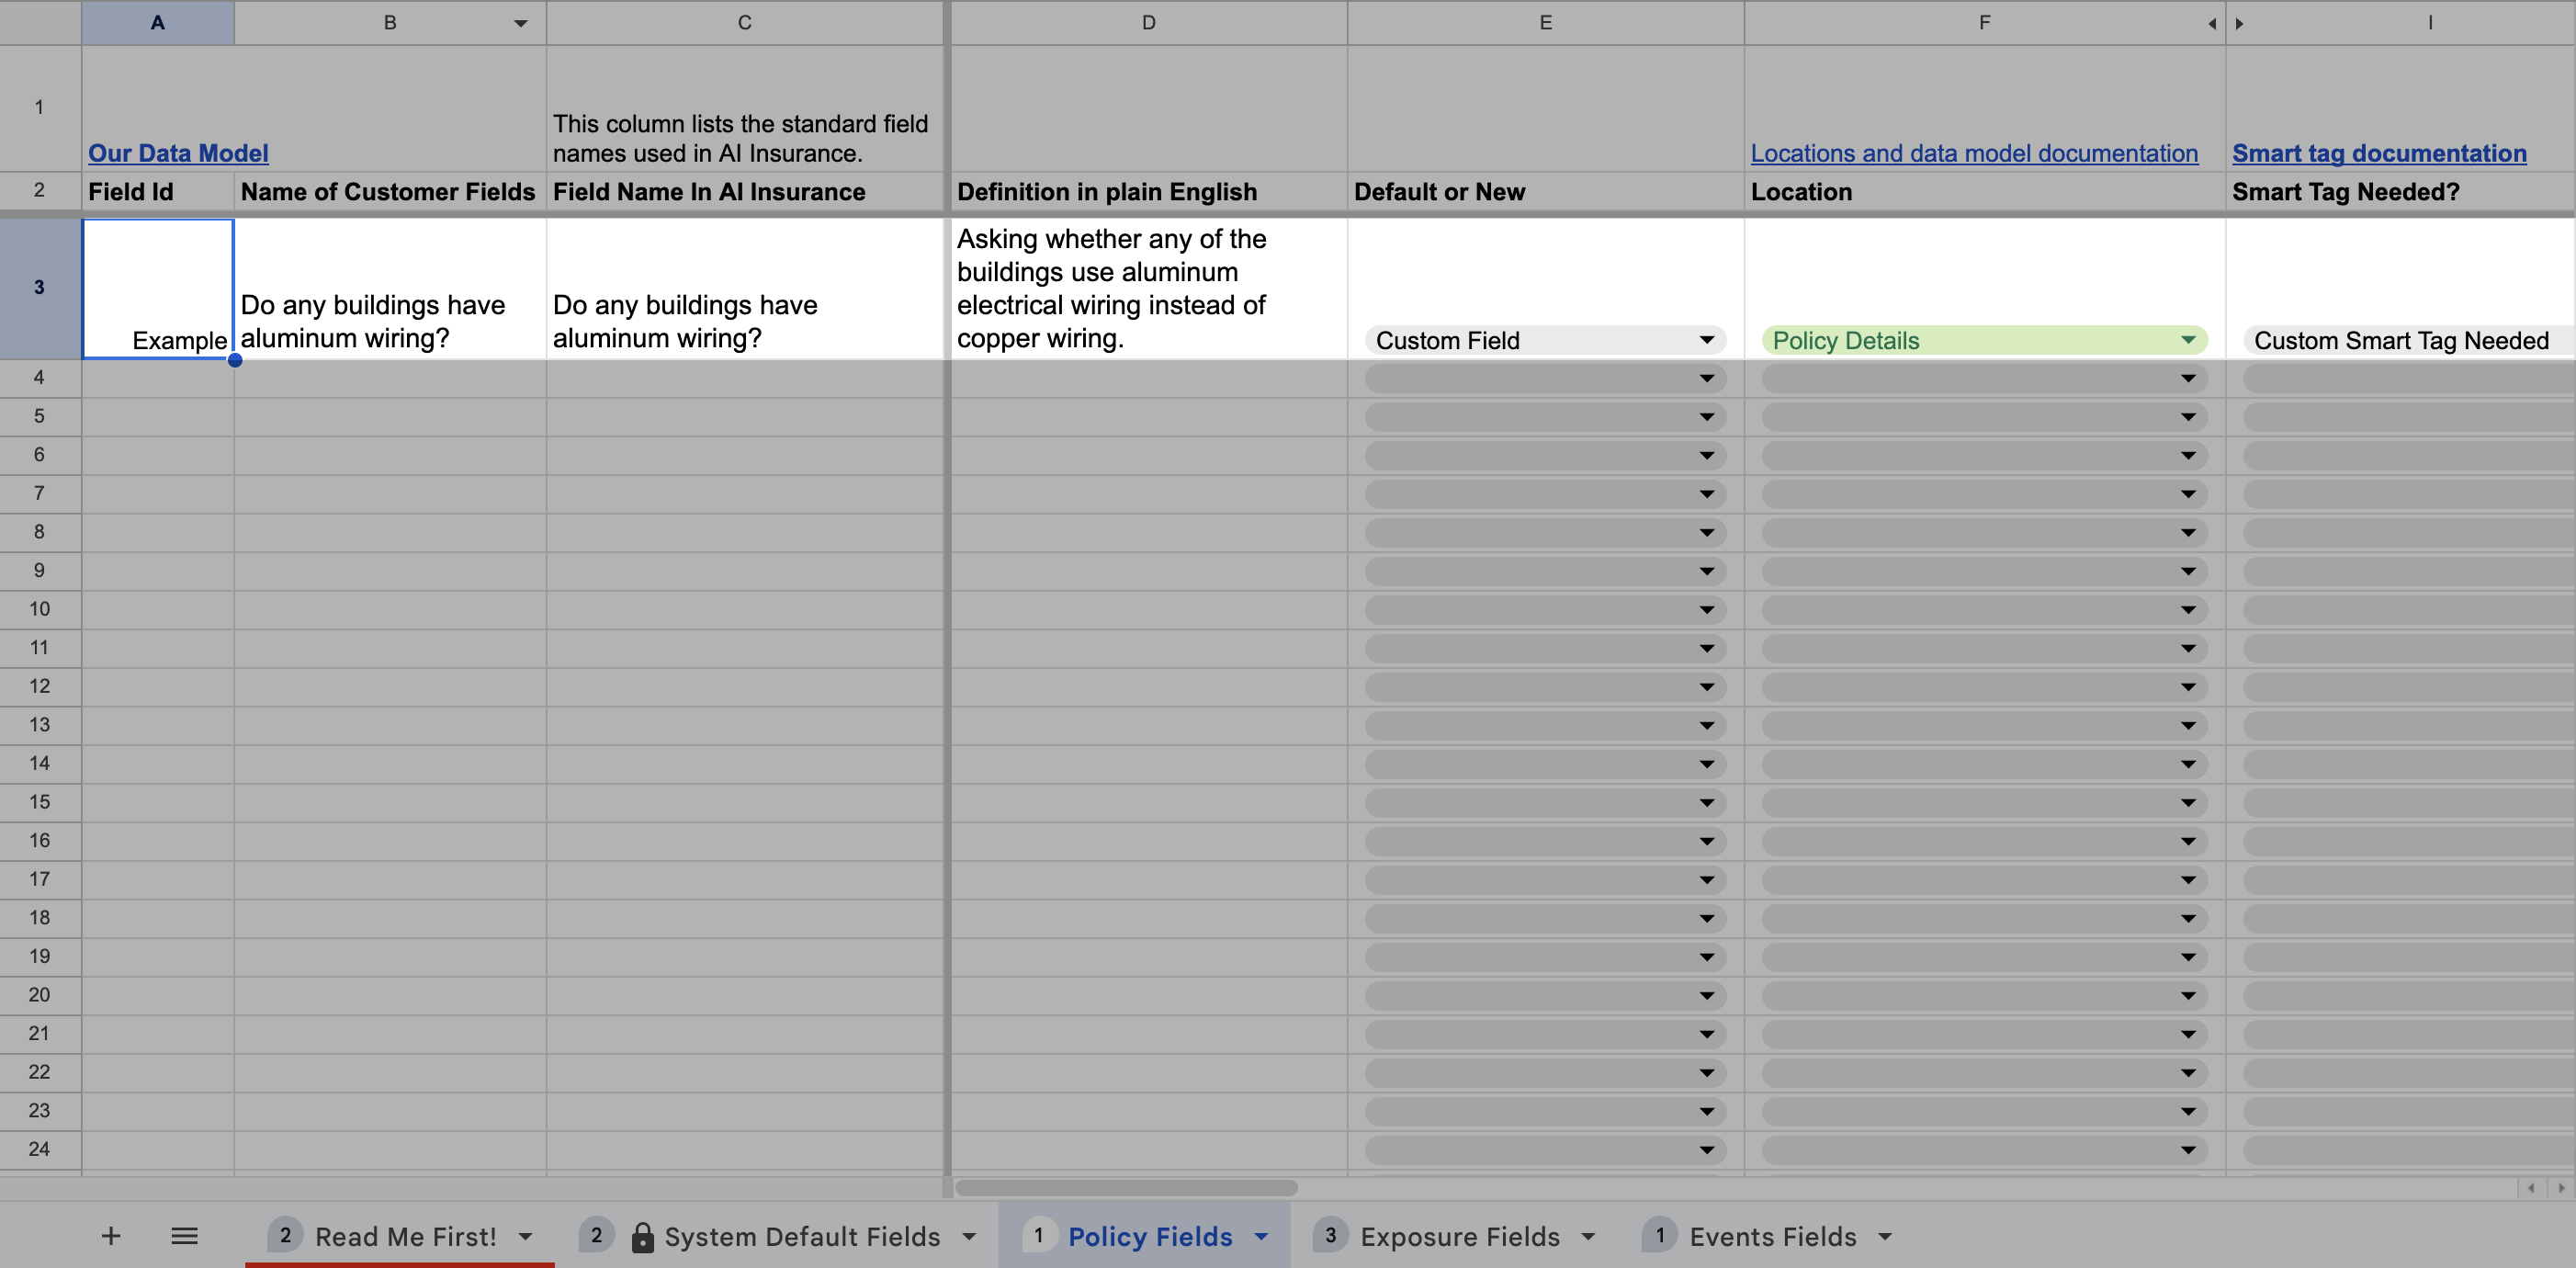
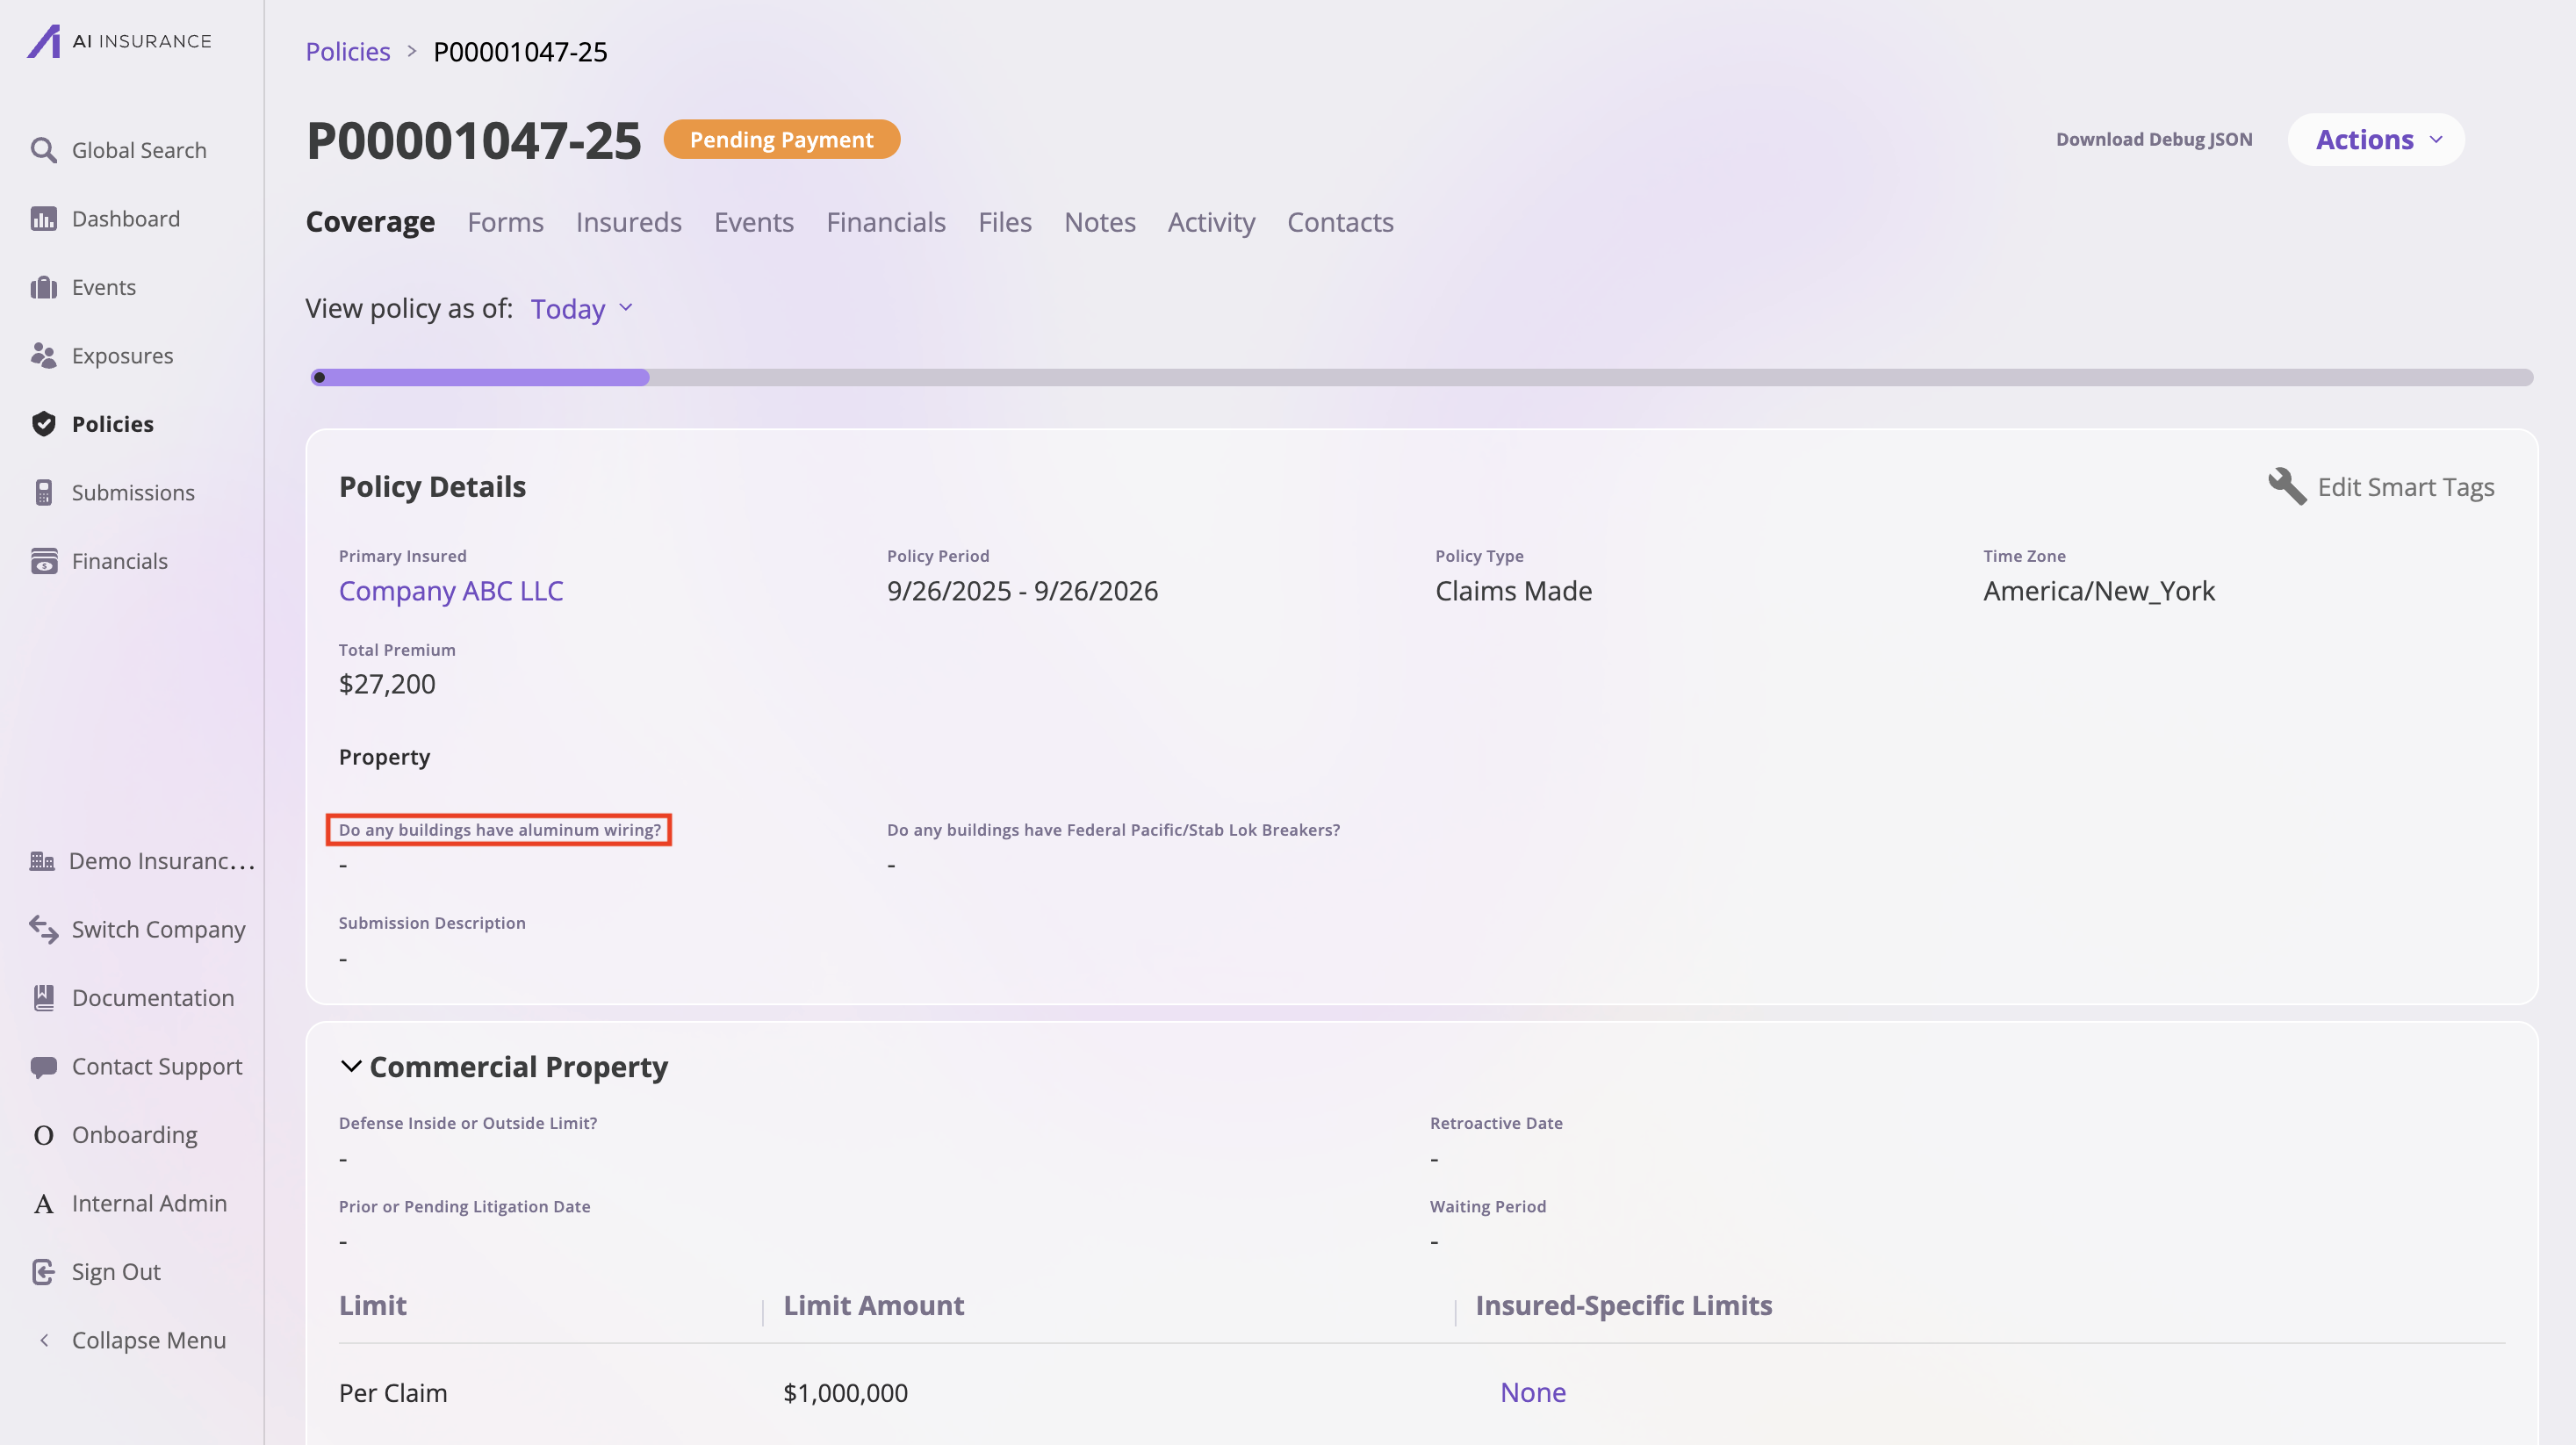
 Use this tab for fields at the **policy level** when writing policies, submissions, and quotes. These fields contain information that applies to the **entire policy**, regardless of how many items (or "exposures") it covers. Think of this as the "cover sheet" of a folder—it applies to everything inside. Examples include policy number, effective dates, broker information, and total premium. **Add your custom policy-level fields here**.
When you add fields in the Policy Fields tab, they will be displayed in the **Policy Details** section of the policy page. These fields appear in collapsible sections on the policy details page where you can view and edit policy-level information. For more information about viewing and managing policies, see [Viewing a Policy](/policing/policy-management/viewing-a-policy).
For detailed instructions on how to fill out the Policy Fields tab, see the "Step 2: How to Fill Out Each Tab" section below.
**Example:**
The images below show how a field entered in the Field Data Model spreadsheet appears in the application:
**1. Field entry in the Field Data Model spreadsheet:**
Use this tab for fields at the **policy level** when writing policies, submissions, and quotes. These fields contain information that applies to the **entire policy**, regardless of how many items (or "exposures") it covers. Think of this as the "cover sheet" of a folder—it applies to everything inside. Examples include policy number, effective dates, broker information, and total premium. **Add your custom policy-level fields here**.
When you add fields in the Policy Fields tab, they will be displayed in the **Policy Details** section of the policy page. These fields appear in collapsible sections on the policy details page where you can view and edit policy-level information. For more information about viewing and managing policies, see [Viewing a Policy](/policing/policy-management/viewing-a-policy).
For detailed instructions on how to fill out the Policy Fields tab, see the "Step 2: How to Fill Out Each Tab" section below.
**Example:**
The images below show how a field entered in the Field Data Model spreadsheet appears in the application:
**1. Field entry in the Field Data Model spreadsheet:**
 **2. How the field displays in the application:**
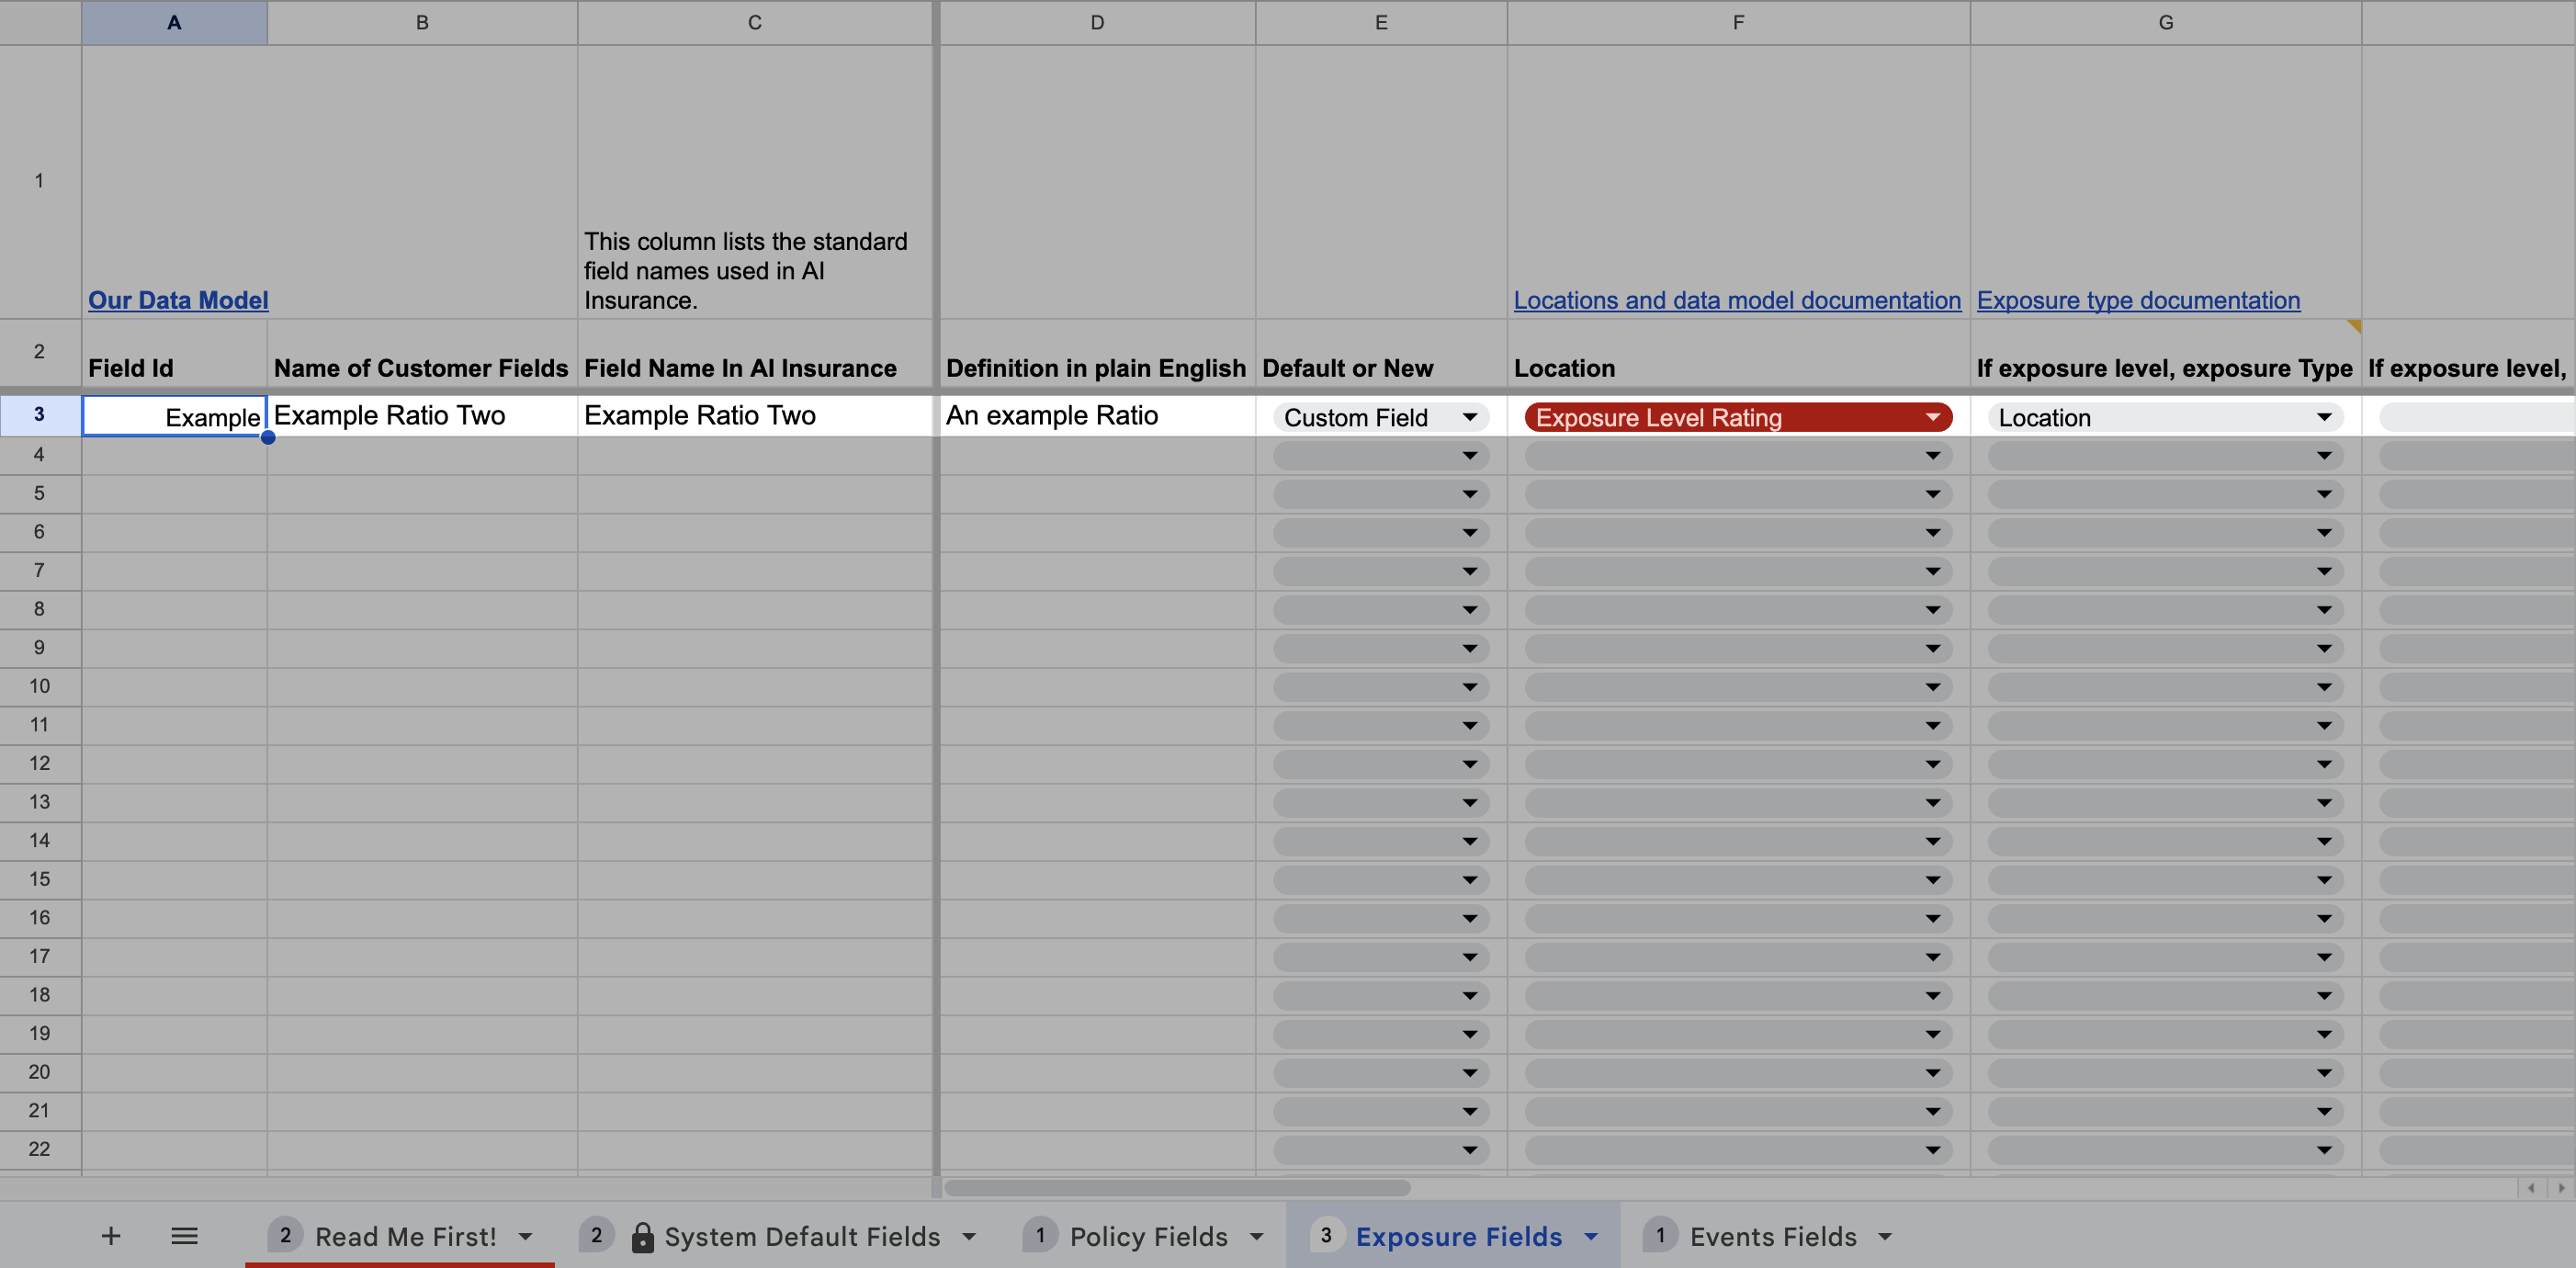
 Use this tab for fields at the **exposure level** (also known as insured or risk level). These fields contain information specific to individual exposures within a policy. If you're unsure whether a field should be at the policy or exposure level, refer to our [Understanding the AI Insurance Model documentation](/getting-started/intro-to-aiinsurance/understanding-the-ai-insurance-model) for clarification. Examples include individual insured details, specific coverage limits per exposure, and exposure-specific ratings. **Add your custom exposure-level fields here**.
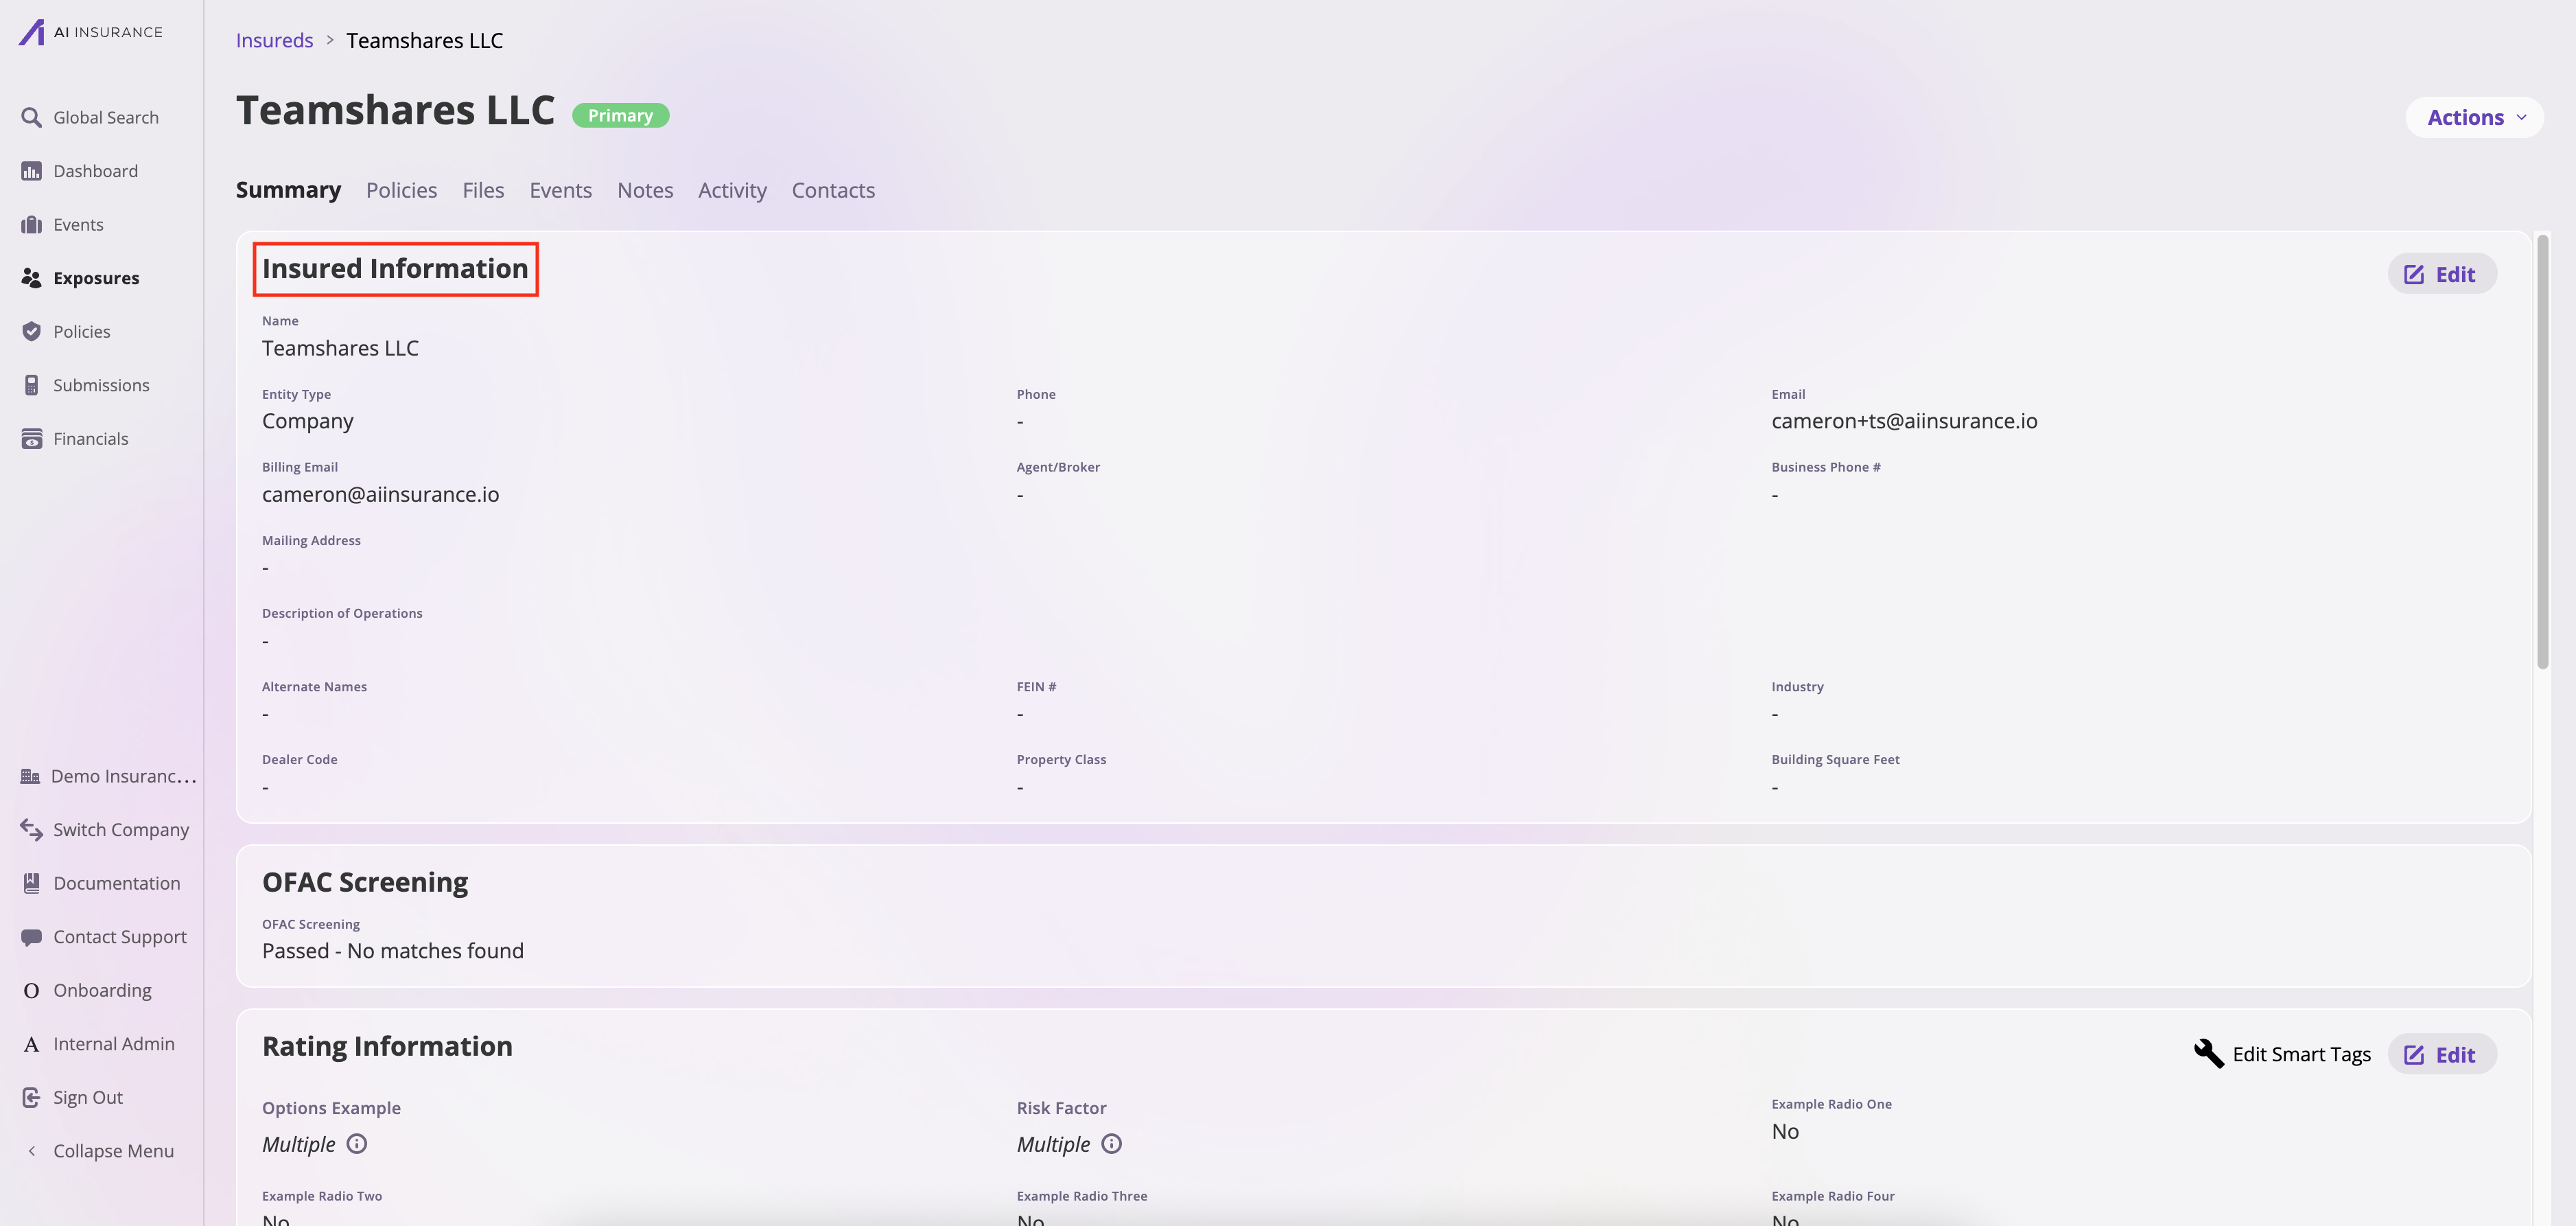
When you add fields in the Exposure Fields tab, they will be displayed in the exposure details section when viewing individual exposures or insureds. These fields appear in the exposure information sections where you can view and edit exposure-level data. For more information about viewing and managing exposures, see [Viewing Insureds](/insureds/viewing-insureds).
**Example:**
The images below show how a field entered in the Field Data Model spreadsheet appears in the application:
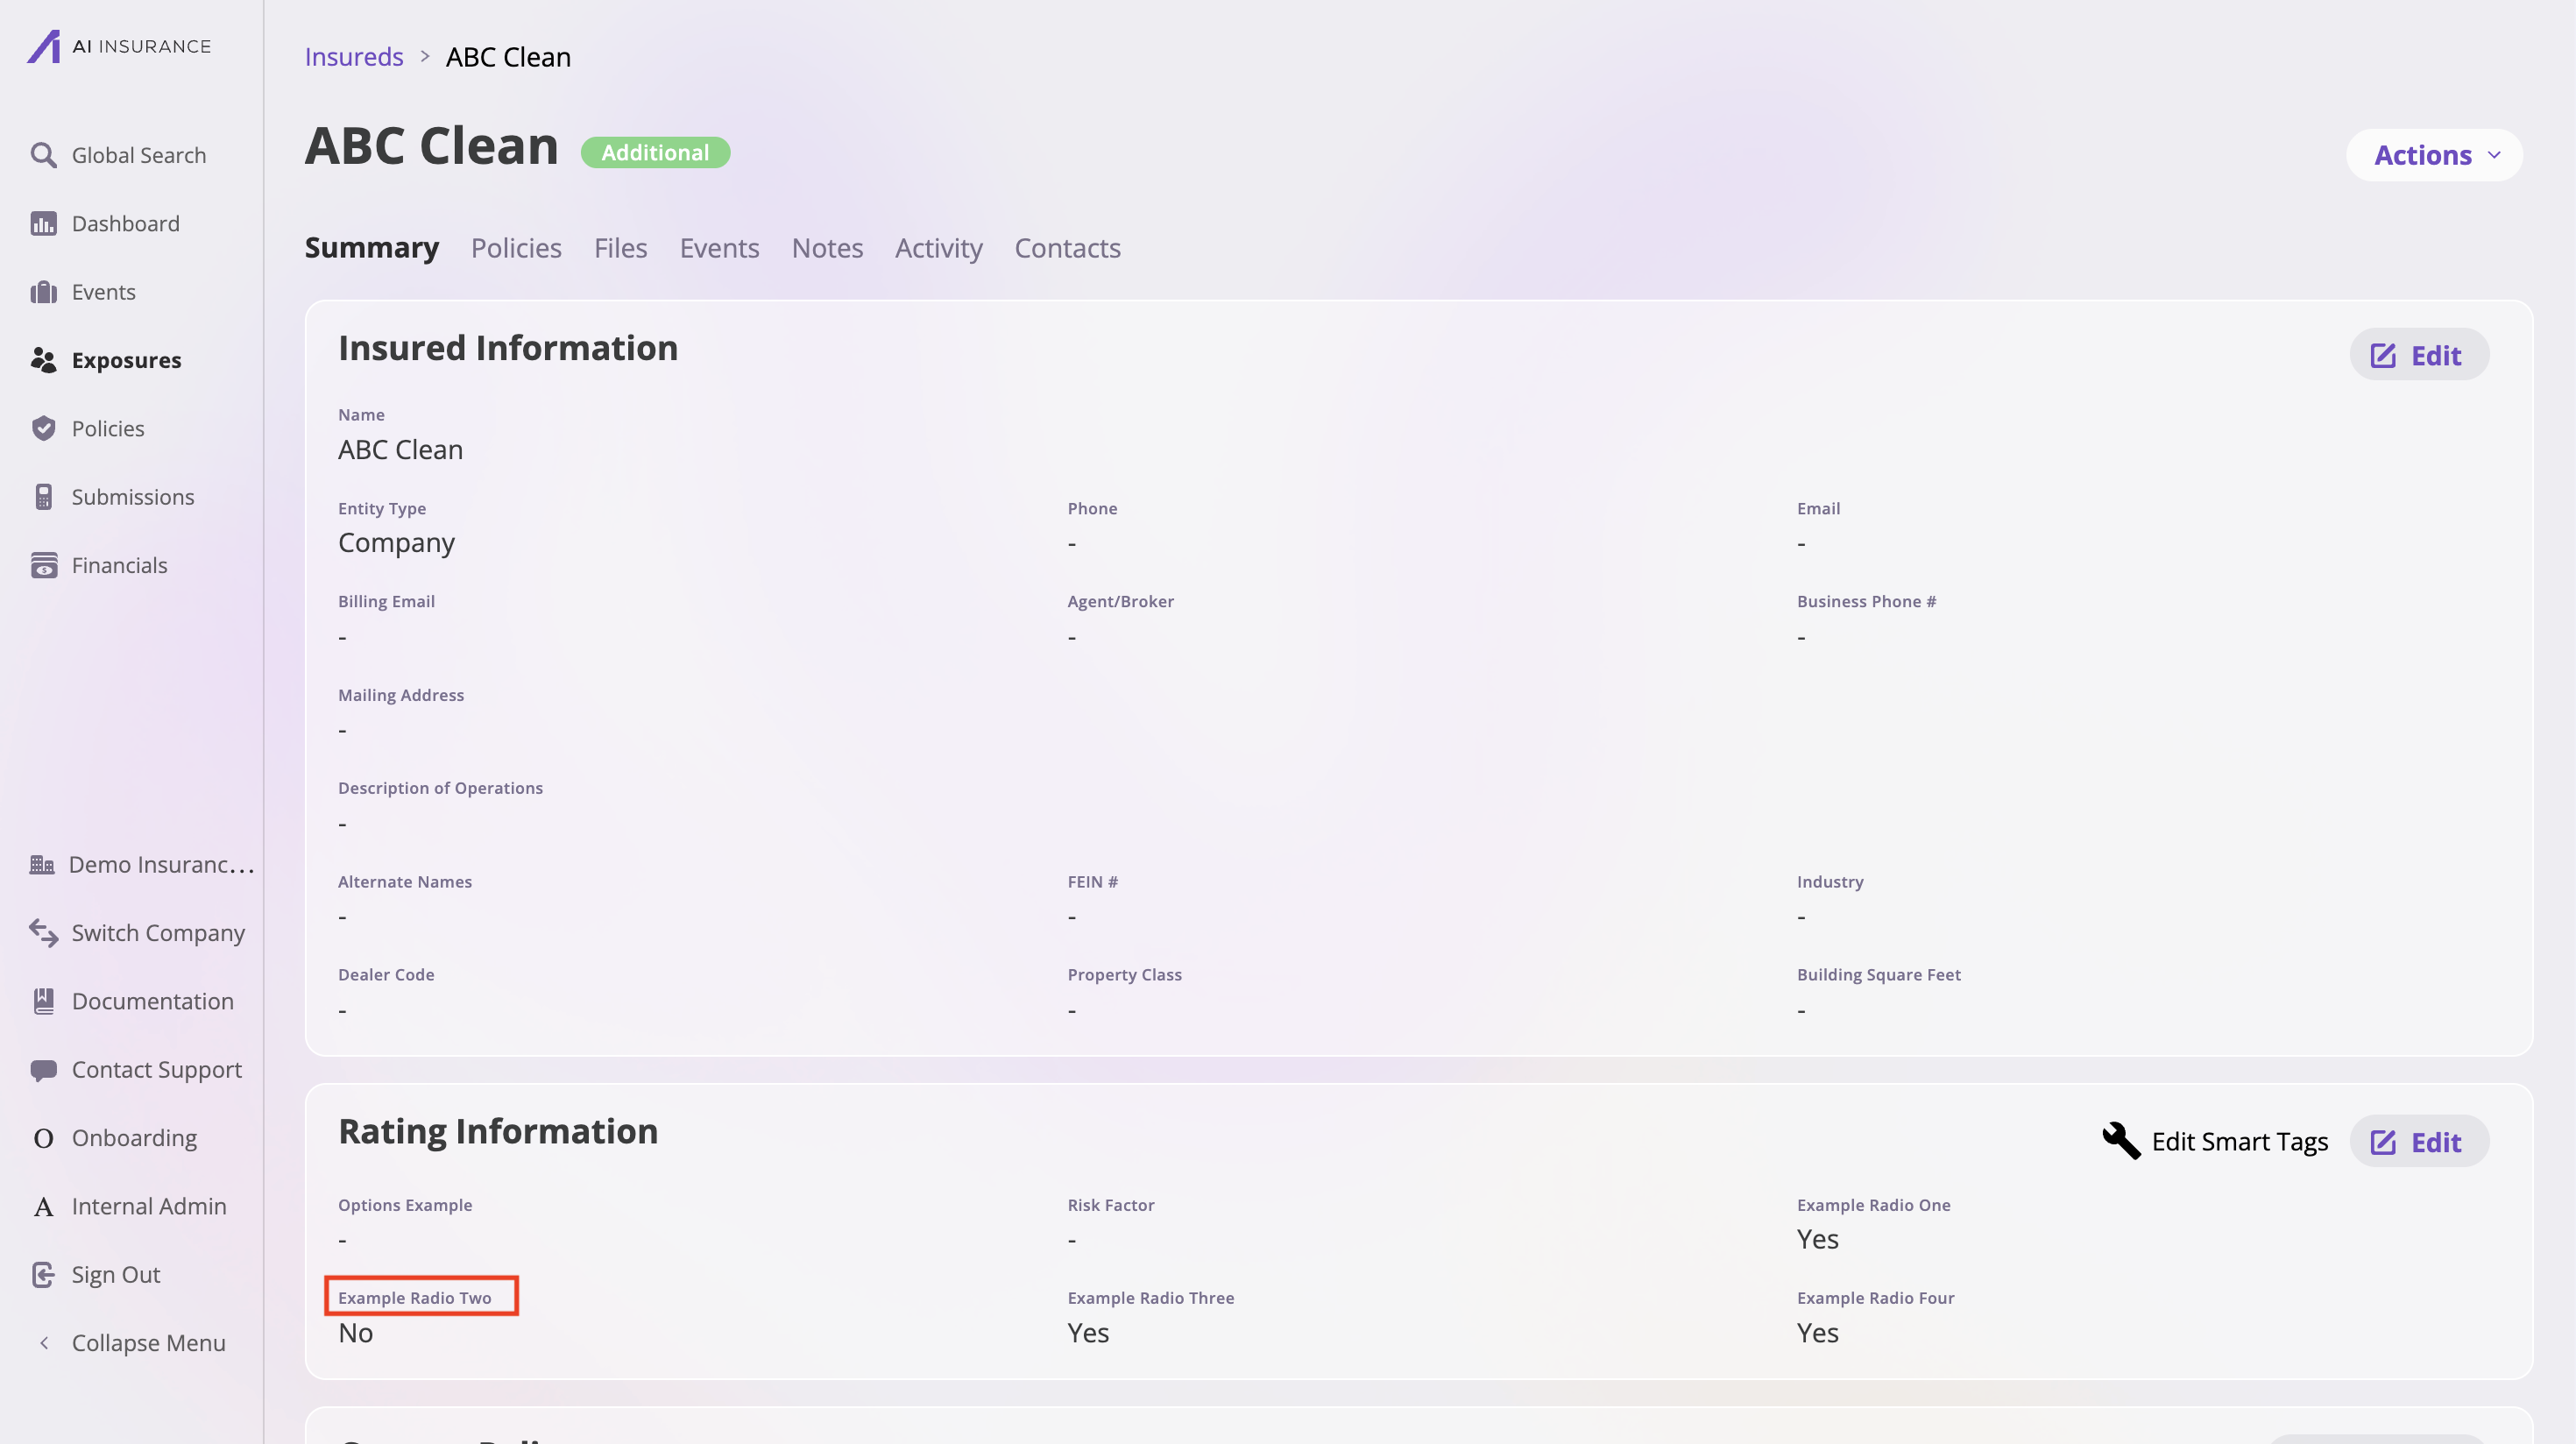
**1. Field entry in the Field Data Model spreadsheet:**
Use this tab for fields at the **exposure level** (also known as insured or risk level). These fields contain information specific to individual exposures within a policy. If you're unsure whether a field should be at the policy or exposure level, refer to our [Understanding the AI Insurance Model documentation](/getting-started/intro-to-aiinsurance/understanding-the-ai-insurance-model) for clarification. Examples include individual insured details, specific coverage limits per exposure, and exposure-specific ratings. **Add your custom exposure-level fields here**.
When you add fields in the Exposure Fields tab, they will be displayed in the exposure details section when viewing individual exposures or insureds. These fields appear in the exposure information sections where you can view and edit exposure-level data. For more information about viewing and managing exposures, see [Viewing Insureds](/insureds/viewing-insureds).
**Example:**
The images below show how a field entered in the Field Data Model spreadsheet appears in the application:
**1. Field entry in the Field Data Model spreadsheet:**
 **2. How the field displays in the application:**
 Use this tab for operational records such as **claims** or **incidents**. These fields are used for tracking and managing events that occur after policy issuance. Examples include claim number, incident date, loss amount, and reserve information. **Add your custom event-level fields here**.
For events, you can track both **claims** and **incidents**. The way you fill out the field data model for Event Fields is very similar to the other sections (Policy Fields and Exposure Fields). Follow the same column-by-column instructions and formatting requirements as described in the "Step 2: How to Fill Out Each Tab" section below.
When you add fields in the Event Fields tab, they will be displayed in the event details section when viewing individual claims or incidents. These fields appear in the event information sections where you can view and edit event-level data. For more information about viewing and managing events, see [Viewing Events](/events/view-events/view-events).
**Example:**
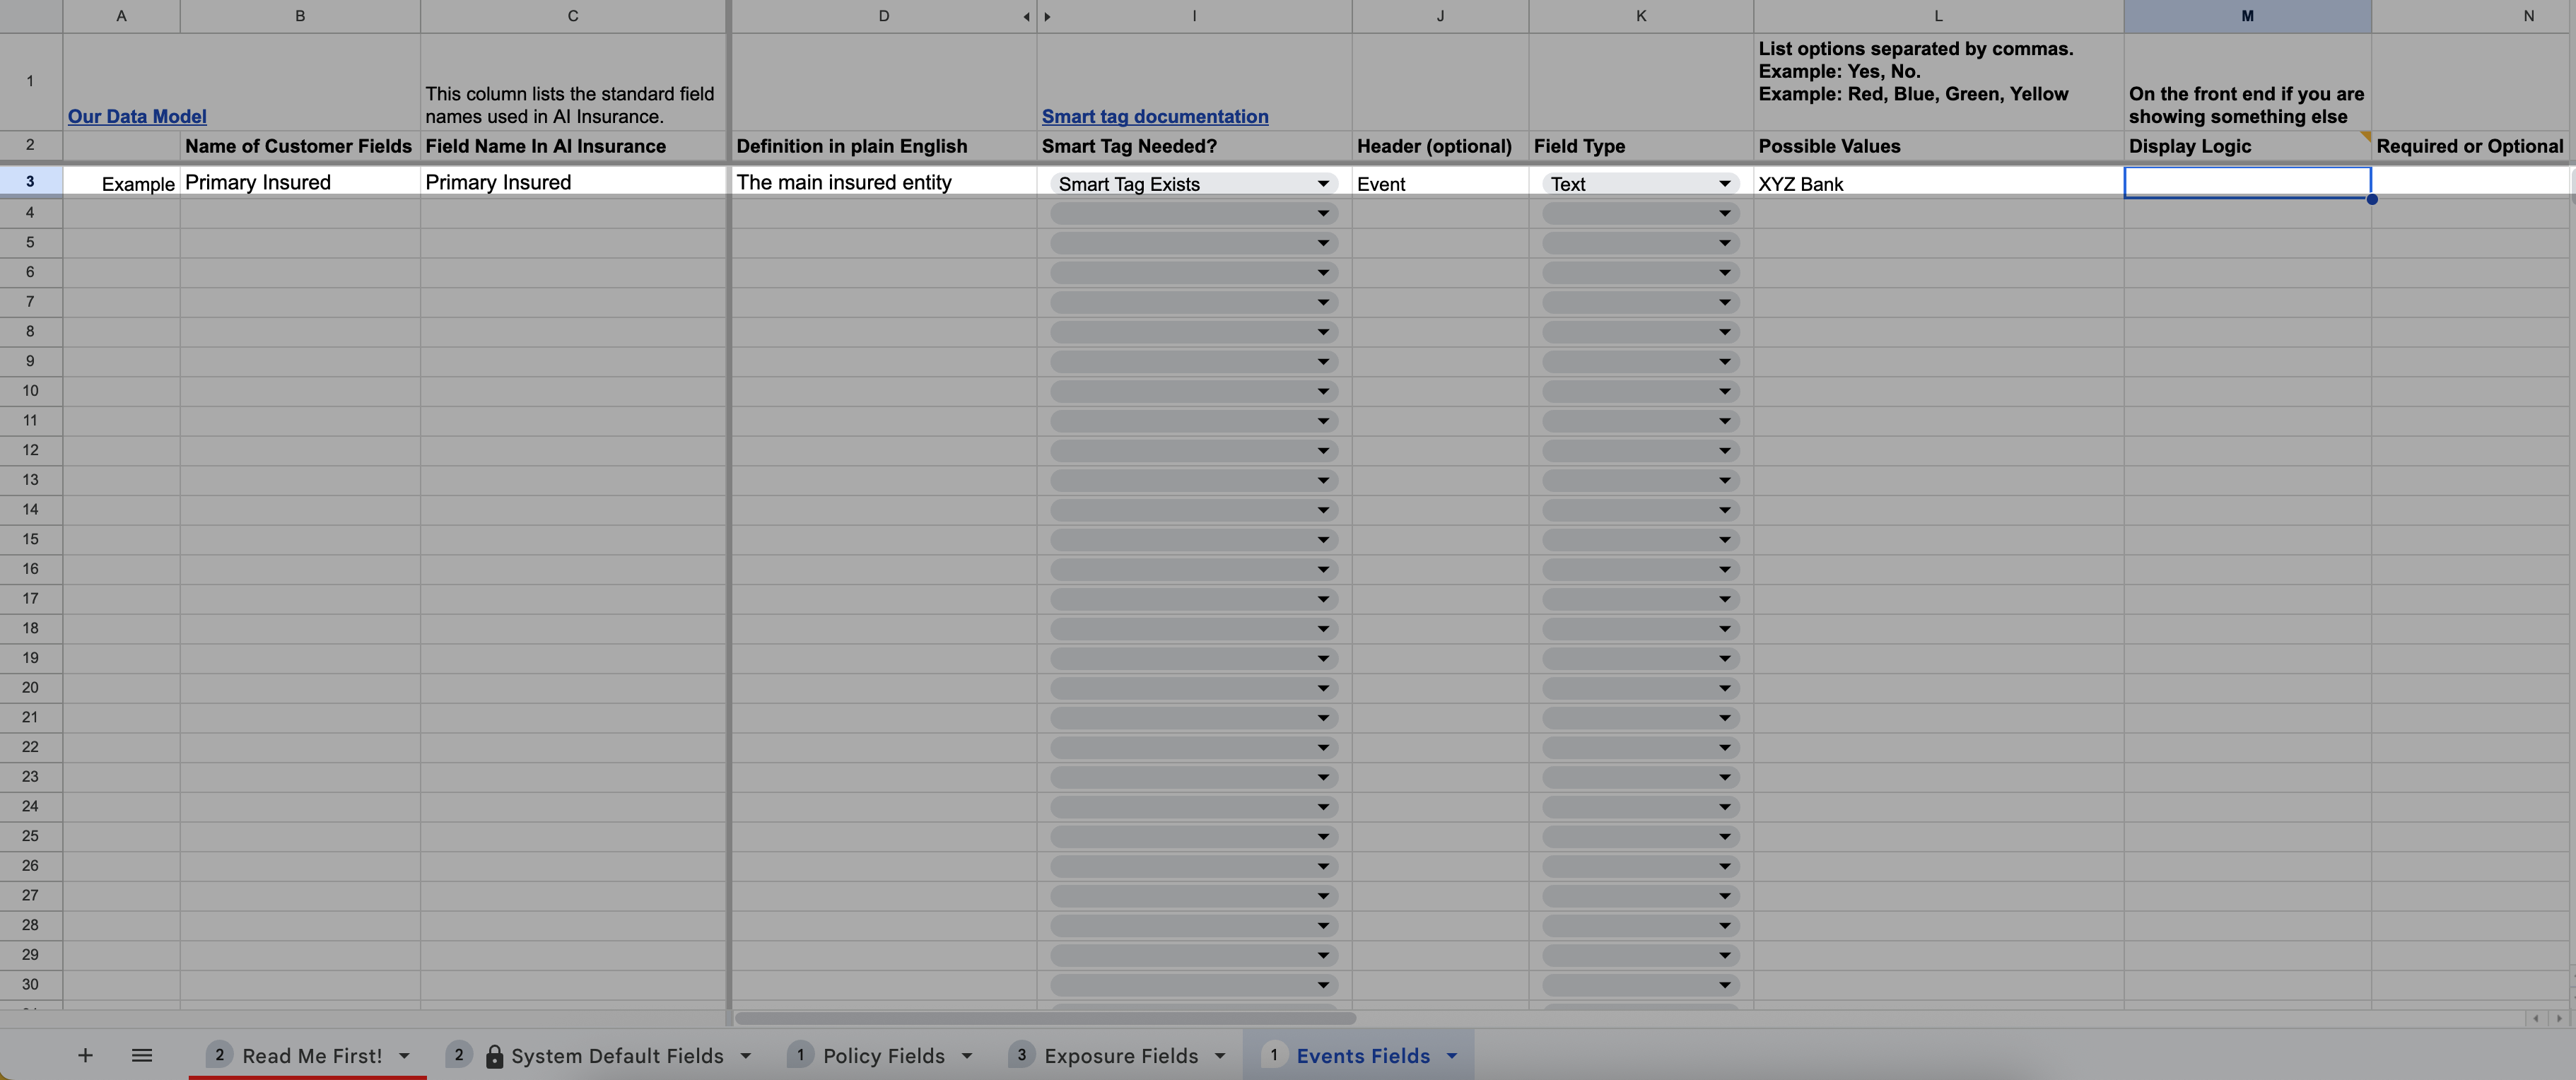
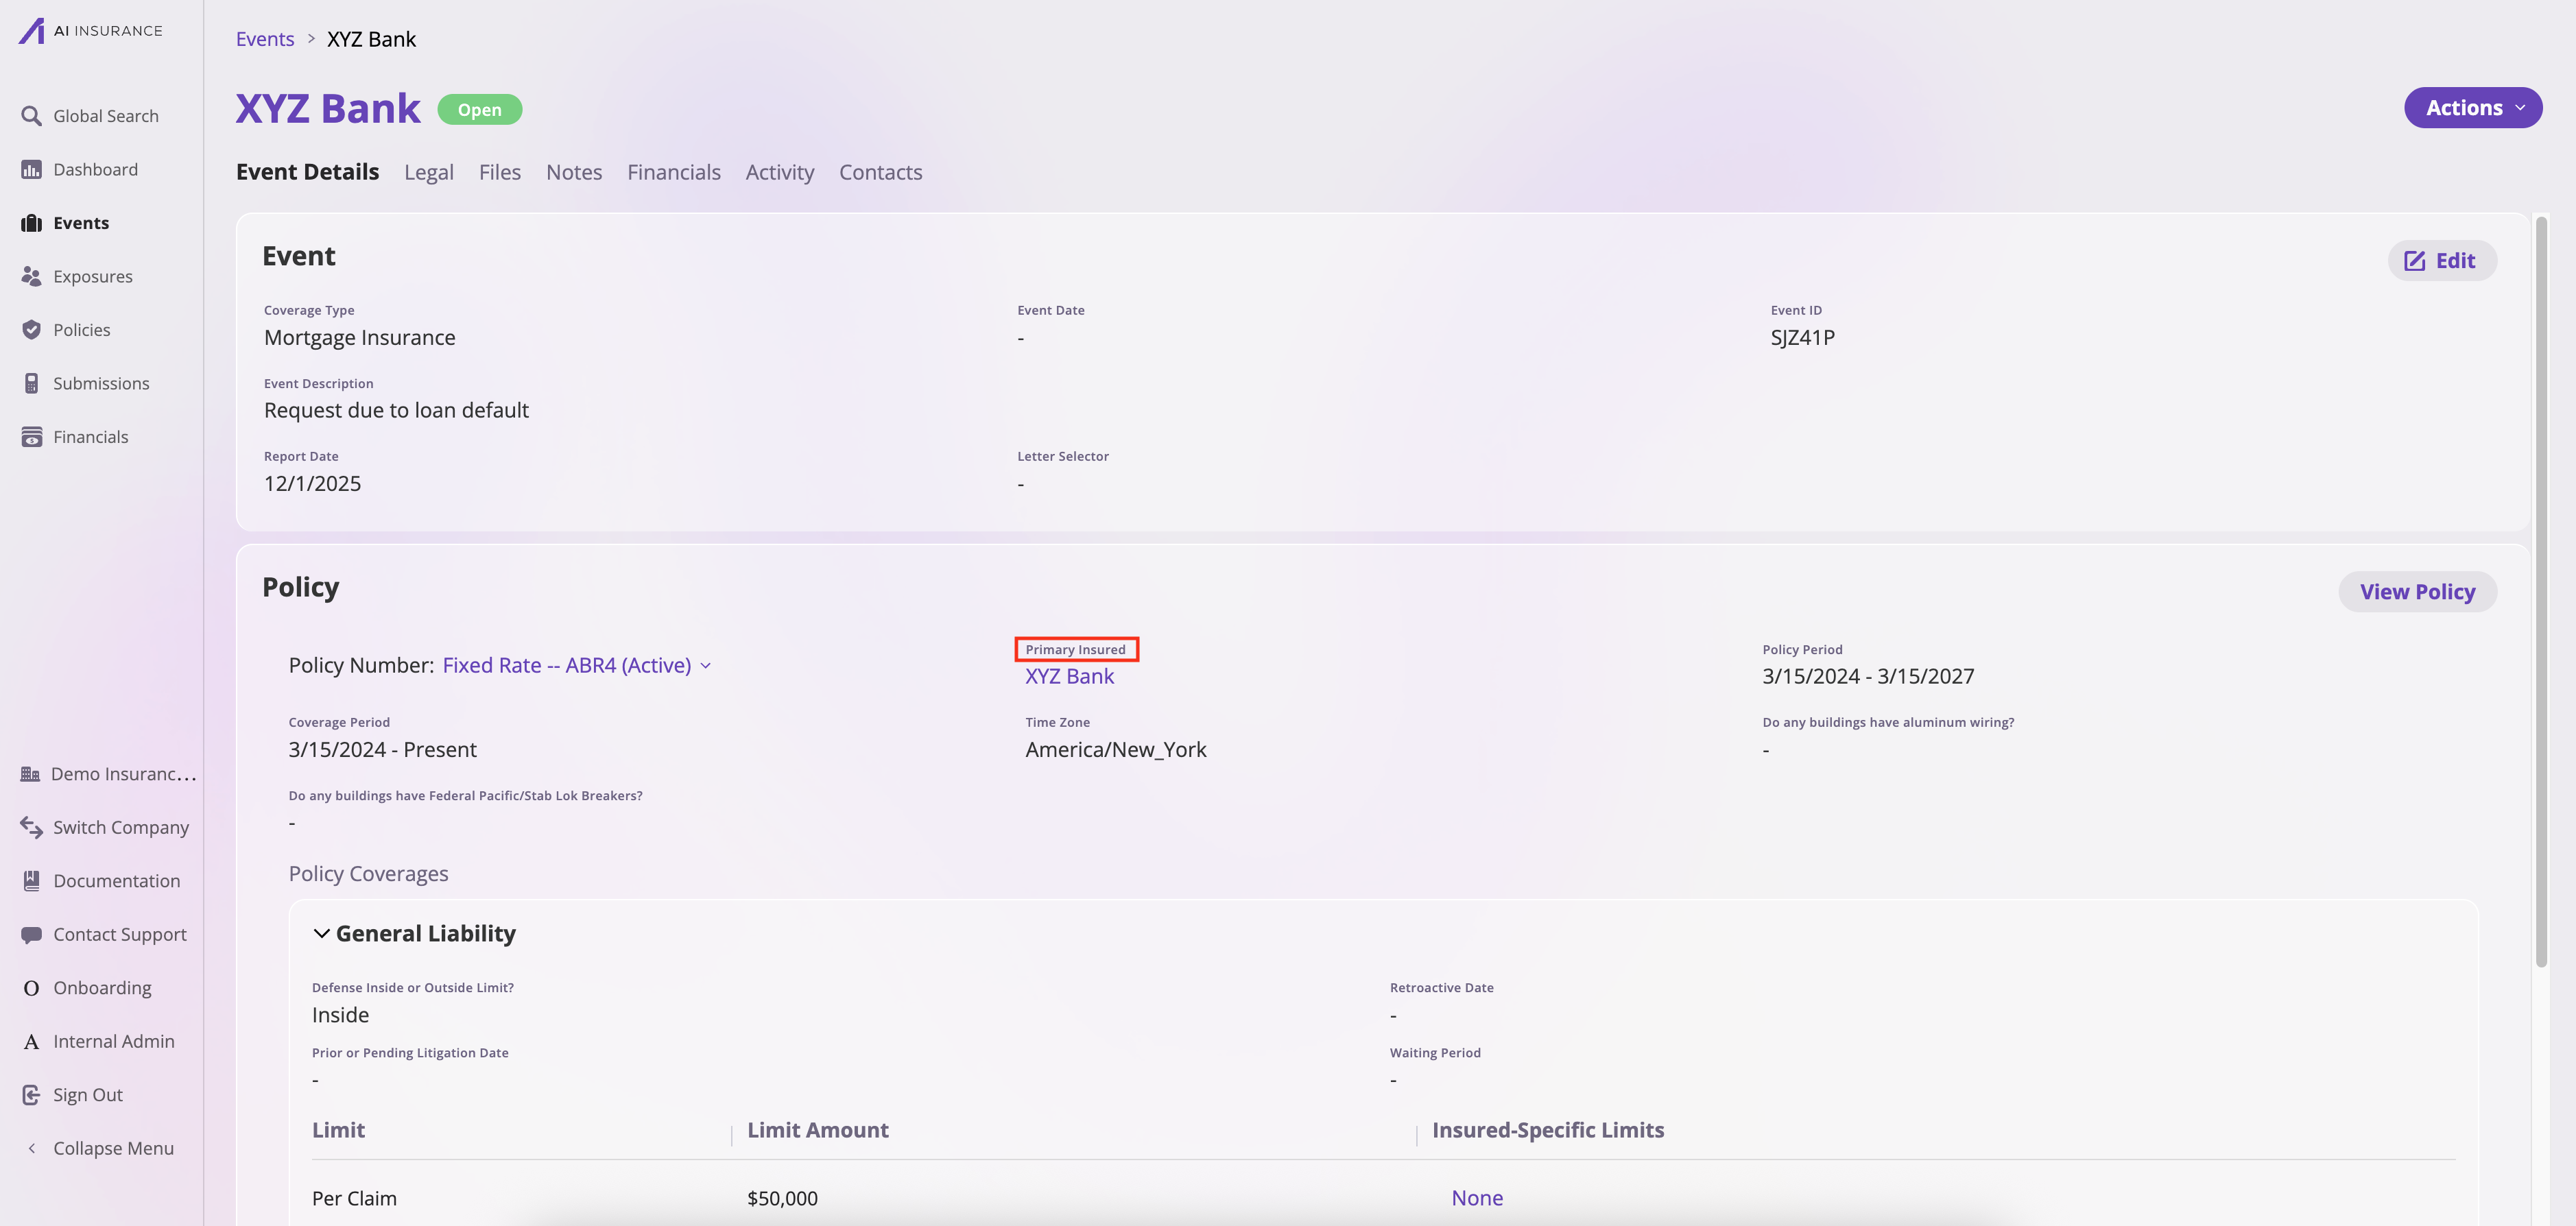
The images below show how a field entered in the Field Data Model spreadsheet appears in the application:
**1. Field entry in the Field Data Model spreadsheet:**
Use this tab for operational records such as **claims** or **incidents**. These fields are used for tracking and managing events that occur after policy issuance. Examples include claim number, incident date, loss amount, and reserve information. **Add your custom event-level fields here**.
For events, you can track both **claims** and **incidents**. The way you fill out the field data model for Event Fields is very similar to the other sections (Policy Fields and Exposure Fields). Follow the same column-by-column instructions and formatting requirements as described in the "Step 2: How to Fill Out Each Tab" section below.
When you add fields in the Event Fields tab, they will be displayed in the event details section when viewing individual claims or incidents. These fields appear in the event information sections where you can view and edit event-level data. For more information about viewing and managing events, see [Viewing Events](/events/view-events/view-events).
**Example:**
The images below show how a field entered in the Field Data Model spreadsheet appears in the application:
**1. Field entry in the Field Data Model spreadsheet:**
 **2. How the field displays in the application:**
 **Tip**: If you have questions about what a specific column is for, check the comments in the header row of each tab. These comments provide detailed explanations for each column's purpose and requirements.
### Step 2: How to Fill Out Each Tab
This section provides detailed instructions on how to fill out each tab in the Field Data Model spreadsheet. For each tab, we will explain it column by column.
The System Default Fields tab displays all the standard fields that already exist in the AI Insurance platform. This tab is **for reference only**—do not fill out or modify this tab. Understanding the columns in this tab will help you understand how to fill out the other tabs when adding custom fields.
**Tip**: If you have questions about what a specific column is for, check the comments in the header row of each tab. These comments provide detailed explanations for each column's purpose and requirements.
### Step 2: How to Fill Out Each Tab
This section provides detailed instructions on how to fill out each tab in the Field Data Model spreadsheet. For each tab, we will explain it column by column.
The System Default Fields tab displays all the standard fields that already exist in the AI Insurance platform. This tab is **for reference only**—do not fill out or modify this tab. Understanding the columns in this tab will help you understand how to fill out the other tabs when adding custom fields.
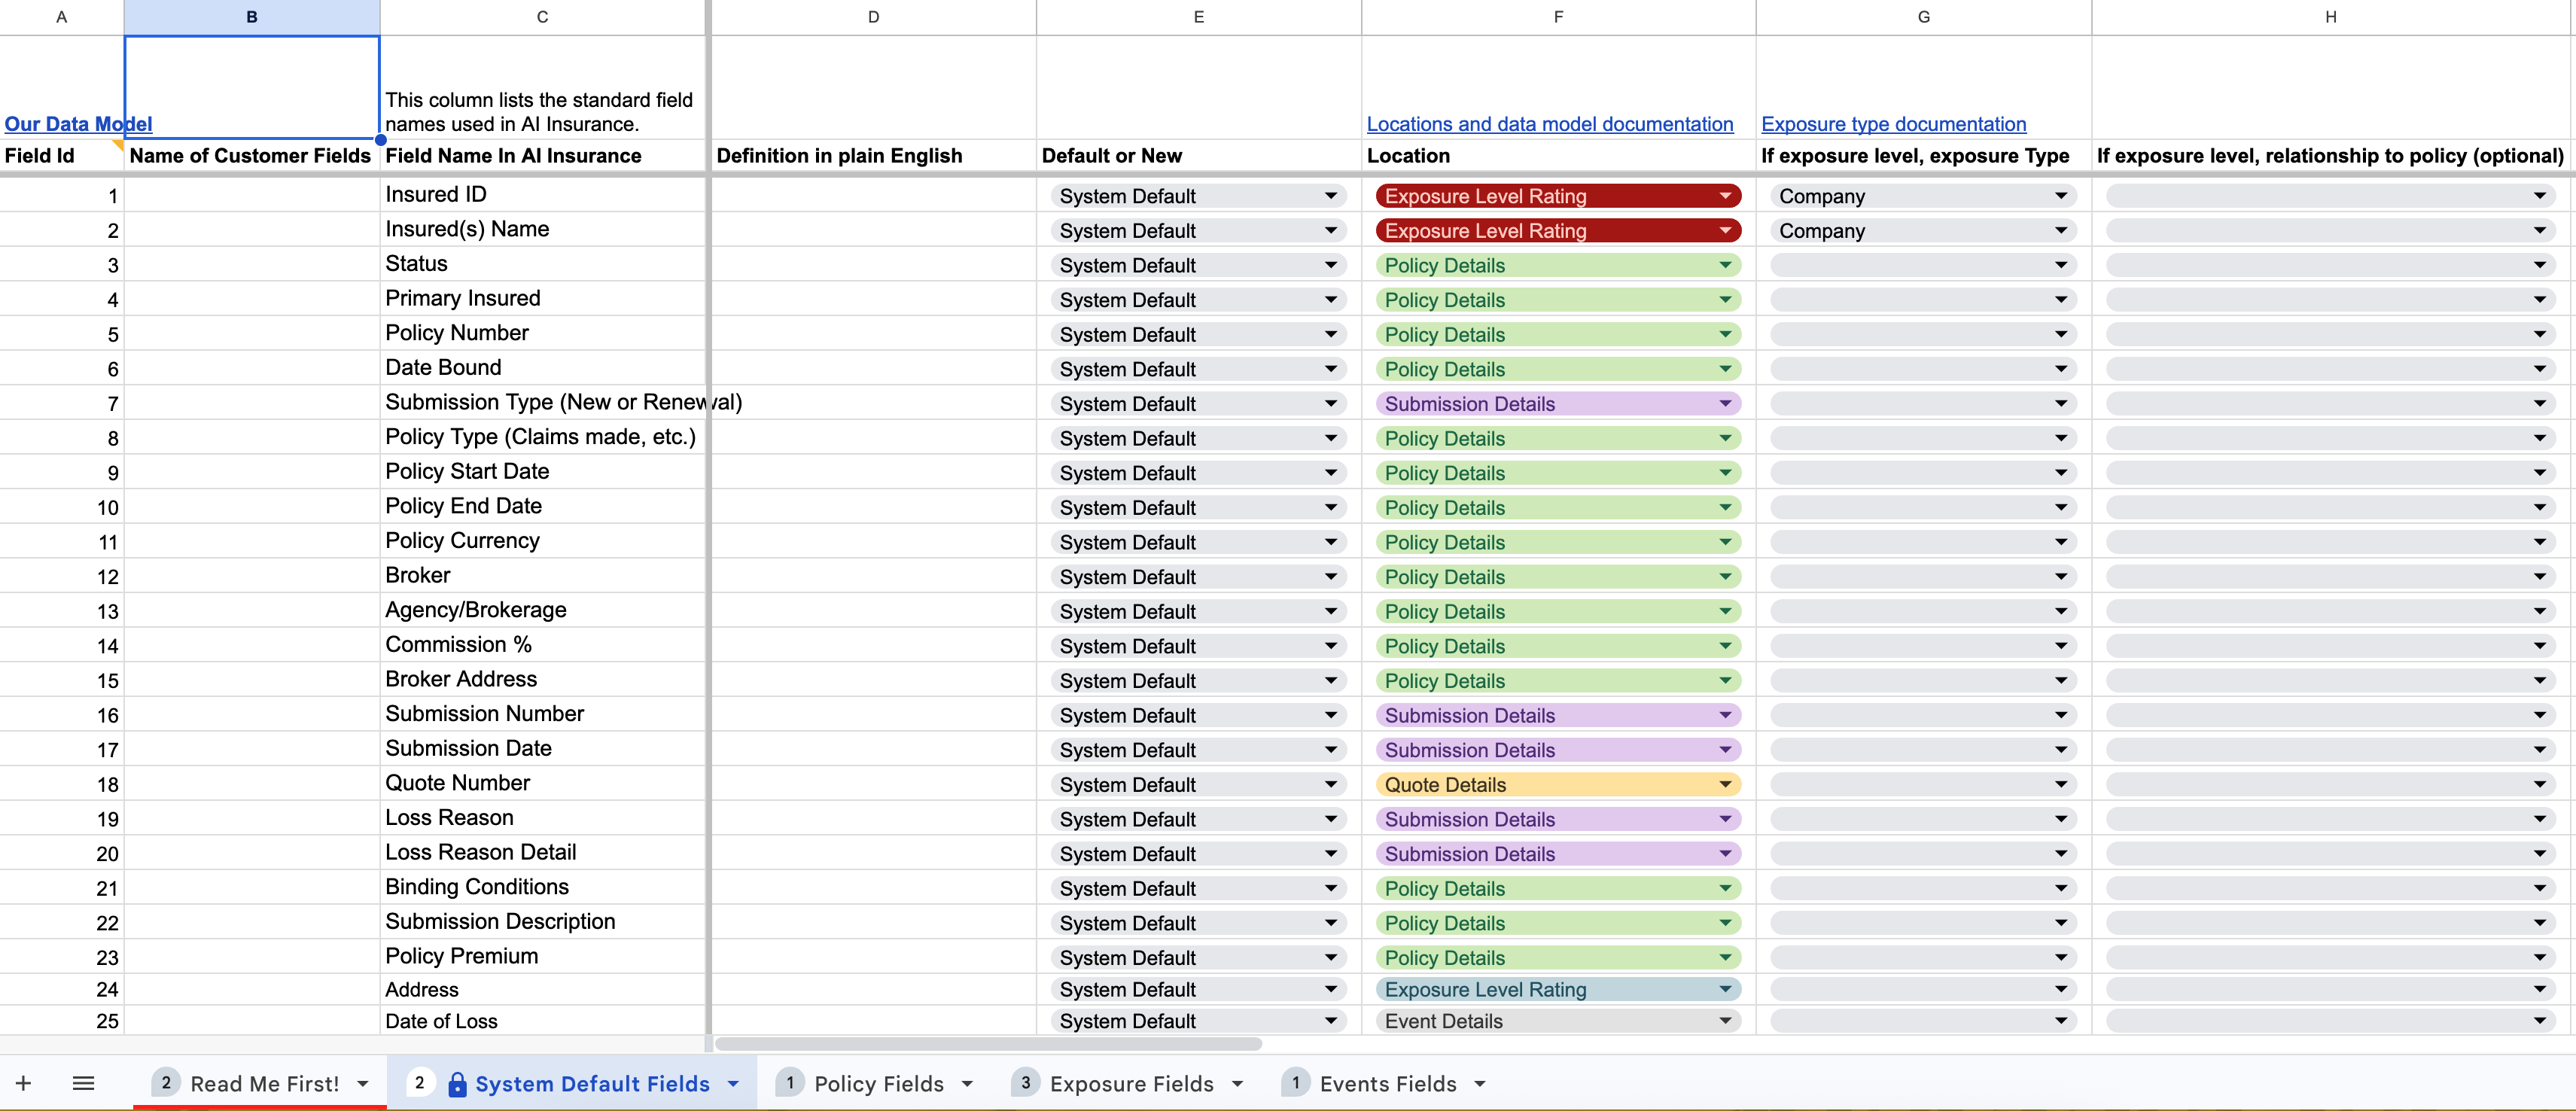 **Field Explanation:**
* **Field ID**: This is a sequential number assigned to each field for quick reference. Use this number when discussing specific fields with the AI Insurance team.
* **Name of Customer Fields**: This shows the name of the field as it appears in your existing data or system. This helps identify which of your fields corresponds to each AI Insurance standard field.
* **Field Name In AI Insurance**: This is the standard field name used in the AI Insurance platform. This is how the field will be displayed in your AI Insurance instance.
* **Definition**: This provides a plain English definition of what each field represents and how it's used in the system.
* **Default or New**: In the System Default Fields tab, all fields are marked as **"System Default"**, indicating these are predefined fields that come standard with the platform. You do not need to add these fields again as custom fields.
* **Location**: This indicates where the field is located in the AI Insurance data model. The location determines where the field appears and how it's used in the application. You can select from the dropdown menu to see all available options. The available locations are:
* **Policy Details**: Information that applies to the entire policy—regardless of how many items (or "exposures") it covers. This is like the cover sheet of the folder—it applies to everything inside. Policy details is information that is **NOT** used for rating.
* **Policy Ratings**: Information that applies to the entire policy but **IS** used for rating.
* **Exposure Level Rating**: For information at the exposure level (sometimes known as the risk or insured level). You can find the difference between policy vs. exposure level in the [Understanding the AI Insurance Model documentation](/getting-started/intro-to-aiinsurance/understanding-the-ai-insurance-model). This is always a rating field, so you need to tell us which entity types the exposure field applies to. For more info on what entity types are, see the [Exposure Type documentation](/getting-started/setting-up-ai-insurance/rating-engine/exposure-types).
* **Submission Details**: Information that goes into a submission but **NOT** a policy. If it also goes into a policy, use Policy Details instead.
* **Quote Details**: Information that goes into a quote but **NOT** a policy. If it also goes into a policy, use Policy Details instead.
* **Event Details**: For information for operational records such as claims or incidents.
Use the dropdown box to see all available location options.
* **If exposure level, exposure Type**: This is only relevant when the **Location** is set to **"Exposure Level Rating"**. An **entity type** refers to the classification of exposures covered under an insurance policy based on their roles, characteristics, or exposure profiles. These classifications help determine the nature of coverage, exposure assessment, and premium calculation.
For example, consider a company providing comprehensive insurance to a hospital. This insurance covers not only the hospital itself but also the doctors working within it and potentially the hospital's vehicles. In this scenario, the hospital might have an entity type of **Company**, the doctors an entity type of **Healthcare Provider**, and the vehicles an entity type of **Auto**.
Common entity types include:
* **Company**: For organizational entities
* **Healthcare Provider**: For medical professionals
* **Property**: For physical properties or locations
* **Auto**: For vehicles
* **Location**: For specific geographic locations
When a field is set to "Exposure Level Rating" in the Location field, you must specify which entity type this field applies to. Use the dropdown box to select the appropriate entity type. For more information about entity types, see the [Rating Engine documentation](/getting-started/setting-up-ai-insurance/rating-engine/rating-engine#what-are-entity-types%3F).
* **If exposure level, relationship to policy (optional)**: This is **optional** and is only relevant when the **Location** is set to **"Exposure Level Rating"**. This defines the relationship between the exposure and the policy, helping to clarify how the exposure relates to the overall policy structure.
Use the dropdown box to select the appropriate relationship type. Available options include:
* **First Named Insured**: The primary insured party listed first on the policy
* **Named Insured**: A party specifically named in the policy
* **Additional Insured**: A party added to the policy who receives coverage under the policy
* **Related Entity/Exposure**: An entity or exposure that is related to the policy but may not be directly named
This field is optional, so you only need to fill it out if you need to specify the relationship between the exposure and the policy for your specific use case.
* **Smart Tag Needed**: If you would like a custom smart tag for this specific field to add information about it in your forms, select **"Customer Smart Tag Needed"**.
Smart tags are variables that can be inserted into your forms to pull data from objects such as policies, insureds, or events. For more information about smart tags and how they work, see the [Smart Tags documentation](/platform/components/smart-tags/smart-tags). For information about coverage-specific smart tags, see the [Coverage Smart Tags documentation](/policing/policy-management/coverage/smart-tags).
* **Header**: The header is used to group related fields together to help organize the details. For example, if you want a group of basic policy detail fields to be under the header "Policy Detail", you would place a header field here. Headers help organize fields into logical sections, making it easier to navigate and manage related information.
**Field Explanation:**
* **Field ID**: This is a sequential number assigned to each field for quick reference. Use this number when discussing specific fields with the AI Insurance team.
* **Name of Customer Fields**: This shows the name of the field as it appears in your existing data or system. This helps identify which of your fields corresponds to each AI Insurance standard field.
* **Field Name In AI Insurance**: This is the standard field name used in the AI Insurance platform. This is how the field will be displayed in your AI Insurance instance.
* **Definition**: This provides a plain English definition of what each field represents and how it's used in the system.
* **Default or New**: In the System Default Fields tab, all fields are marked as **"System Default"**, indicating these are predefined fields that come standard with the platform. You do not need to add these fields again as custom fields.
* **Location**: This indicates where the field is located in the AI Insurance data model. The location determines where the field appears and how it's used in the application. You can select from the dropdown menu to see all available options. The available locations are:
* **Policy Details**: Information that applies to the entire policy—regardless of how many items (or "exposures") it covers. This is like the cover sheet of the folder—it applies to everything inside. Policy details is information that is **NOT** used for rating.
* **Policy Ratings**: Information that applies to the entire policy but **IS** used for rating.
* **Exposure Level Rating**: For information at the exposure level (sometimes known as the risk or insured level). You can find the difference between policy vs. exposure level in the [Understanding the AI Insurance Model documentation](/getting-started/intro-to-aiinsurance/understanding-the-ai-insurance-model). This is always a rating field, so you need to tell us which entity types the exposure field applies to. For more info on what entity types are, see the [Exposure Type documentation](/getting-started/setting-up-ai-insurance/rating-engine/exposure-types).
* **Submission Details**: Information that goes into a submission but **NOT** a policy. If it also goes into a policy, use Policy Details instead.
* **Quote Details**: Information that goes into a quote but **NOT** a policy. If it also goes into a policy, use Policy Details instead.
* **Event Details**: For information for operational records such as claims or incidents.
Use the dropdown box to see all available location options.
* **If exposure level, exposure Type**: This is only relevant when the **Location** is set to **"Exposure Level Rating"**. An **entity type** refers to the classification of exposures covered under an insurance policy based on their roles, characteristics, or exposure profiles. These classifications help determine the nature of coverage, exposure assessment, and premium calculation.
For example, consider a company providing comprehensive insurance to a hospital. This insurance covers not only the hospital itself but also the doctors working within it and potentially the hospital's vehicles. In this scenario, the hospital might have an entity type of **Company**, the doctors an entity type of **Healthcare Provider**, and the vehicles an entity type of **Auto**.
Common entity types include:
* **Company**: For organizational entities
* **Healthcare Provider**: For medical professionals
* **Property**: For physical properties or locations
* **Auto**: For vehicles
* **Location**: For specific geographic locations
When a field is set to "Exposure Level Rating" in the Location field, you must specify which entity type this field applies to. Use the dropdown box to select the appropriate entity type. For more information about entity types, see the [Rating Engine documentation](/getting-started/setting-up-ai-insurance/rating-engine/rating-engine#what-are-entity-types%3F).
* **If exposure level, relationship to policy (optional)**: This is **optional** and is only relevant when the **Location** is set to **"Exposure Level Rating"**. This defines the relationship between the exposure and the policy, helping to clarify how the exposure relates to the overall policy structure.
Use the dropdown box to select the appropriate relationship type. Available options include:
* **First Named Insured**: The primary insured party listed first on the policy
* **Named Insured**: A party specifically named in the policy
* **Additional Insured**: A party added to the policy who receives coverage under the policy
* **Related Entity/Exposure**: An entity or exposure that is related to the policy but may not be directly named
This field is optional, so you only need to fill it out if you need to specify the relationship between the exposure and the policy for your specific use case.
* **Smart Tag Needed**: If you would like a custom smart tag for this specific field to add information about it in your forms, select **"Customer Smart Tag Needed"**.
Smart tags are variables that can be inserted into your forms to pull data from objects such as policies, insureds, or events. For more information about smart tags and how they work, see the [Smart Tags documentation](/platform/components/smart-tags/smart-tags). For information about coverage-specific smart tags, see the [Coverage Smart Tags documentation](/policing/policy-management/coverage/smart-tags).
* **Header**: The header is used to group related fields together to help organize the details. For example, if you want a group of basic policy detail fields to be under the header "Policy Detail", you would place a header field here. Headers help organize fields into logical sections, making it easier to navigate and manage related information.
 * **Field Type**: The field type determines how each field is presented and what kind of data it accepts.
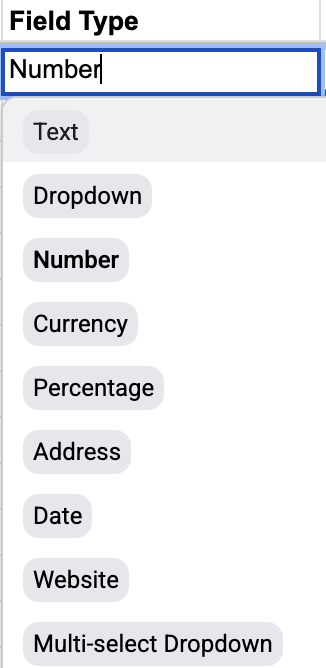 Available field types:
* **Text**: Free-form text input. Example: "ABC Insurance Company" or "Medical Professional Liability"
* **Number**: Numeric values. Example: `123421` (policy number) or `5000` (quantity)
* **Currency**: Monetary values. Example: `$1,000.00` or `USD 50,000`
* **Percentage**: Percentage values. Example: `12.5%` or `5%`
* **Date**: Date values. Example: `01/15/2024` or `12/31/2025`
* **Address**: Address information. Example: `123 Main St, New York, NY 10001`
* **Website**: URL or website links. Example: `https://example.com` or `www.company.com`
* **Dropdown**: Single selection from a list. Example: Select "Active" from \[Active, Inactive, Pending]
* **Multi-select Dropdown**: Multiple selections from a list. Example: Select "General Liability" and "Property" from coverage options
* **Possible Values**: Provide an example value that demonstrates what data would be entered in this field. This serves as a reference to help understand the expected input format and content.
Example: If the field is called "Insured ID" and it's a number field, the possible value would be `123123123`. If it's a text field called "Company Name", the possible value might be `ABC Insurance Company`.
* **Display Logic**: AI Insurance supports the following display logic options:
1. **Conditional Field Display**: If field 1 equals X, show field Y. Multiple conditions can be combined using AND and OR operators.
2. **Default Values**: Set default values for fields, including default values based on other fields. For example, if field X equals a specific value, pre-fill field Y with a corresponding value.
3. **Validation Logic**: Define numerical range validation. For example, a field must fall within a specific numerical range (e.g., between 0 and 100).
* **Export Required**: This section indicates whether this field is required when exporting policies, events, or exposures. Specify if the field should be included in exports by default. For more information about adding fields for export, see the [Export Customization and Configuration documentation](/platform/reporting-and-reports/export-customization-and-configuration#add-fields-for-export).
The Policy Fields tab follows the same structure and column requirements as the System Default Fields tab. The columns are very similar, but only policy-level data will be displayed here.
**What is Policy Level Rating Data?**
Policy level rating data refers to information that applies to the **entire policy** and is used for **rating calculations**. This is different from policy details, which are also policy-level but are **not** used for rating. Policy level rating data affects how premiums are calculated for the entire policy.
**What Should Be Added Here?**
Add custom fields that:
* Apply to the entire policy (not specific to individual exposures)
* Are used in rating calculations to determine premium
* Represent policy-wide characteristics that impact pricing
Examples of policy level rating data include:
* Policy-wide discount factors
* Overall policy risk modifiers
* Policy-level surcharges or credits
* Aggregate policy characteristics used in rating formulas
**Important Notes:**
* The column structure is identical to the System Default Fields tab
* When setting the **Location** field, use **"Policy Ratings"** for fields used in rating, or **"Policy Details"** for policy-level information not used in rating
* Only policy-level fields should be added here—exposure-specific fields belong in the Exposure Fields tab
* Refer to the System Default Fields Tab section above for detailed column explanations
The Exposure Fields tab follows the same structure and column requirements as the [System Default Fields Tab](#system-default-fields-tab) section above. The columns are very similar, but only exposure-level data will be displayed here.
**What are Exposures?**
Exposures are all the entities (insureds) in each policy. Each policy can contain multiple exposures, and each exposure represents an individual entity or risk covered under the policy. For example, a single policy might cover multiple companies, healthcare providers, properties, vehicles, or other entity types. Each of these individual entities is considered an exposure.
To better understand exposures and how they relate to policies, refer to the [Understanding the AI Insurance Model documentation](/getting-started/intro-to-aiinsurance/understanding-the-ai-insurance-model) and the [Rating Engine documentation](/getting-started/setting-up-ai-insurance/rating-engine/rating-engine).
**What Should Be Added Here?**
Add custom fields that:
* Apply to individual exposures (entities) within a policy
* Are specific to each insured or risk, not the entire policy
* Are used in rating calculations at the exposure level
* Represent characteristics of individual entities that impact pricing
Examples of exposure-level fields include:
* Individual insured details (company name, address, etc.)
* Exposure-specific coverage limits
* Entity-specific risk characteristics
* Individual exposure ratings and modifiers
* Exposure-level deductibles or retentions
**How to Fill Out This Tab:**
The column structure is identical to the System Default Fields tab. When filling out exposure fields:
1. **Location**: Set this to **"Exposure Level Rating"** for fields used in rating calculations
2. **Exposure Type**: When Location is set to "Exposure Level Rating", you must specify which entity type this field applies to (e.g., Company, Healthcare Provider, Property, Auto, Location). Use the dropdown to select the appropriate entity type. For more information about entity types, see the [Rating Engine documentation](/getting-started/setting-up-ai-insurance/rating-engine/rating-engine#what-are-entity-types%3F).
3. **Relationship to Policy (optional)**: If needed, specify the relationship between the exposure and the policy (First Named Insured, Named Insured, Additional Insured, or Related Entity/Exposure)
**Important Notes:**
* Only exposure-level fields should be added here—policy-level fields belong in the Policy Fields tab
* Each exposure field must specify which entity type it applies to when used for rating
* Refer to the System Default Fields Tab section above for detailed column explanations
The Event Fields tab follows the same structure and column requirements as the [System Default Fields Tab](#system-default-fields-tab) section above. The columns are very similar, but only event-level data will be displayed here.
**What are Events?**
Events are operational records that track **claims** and **incidents** that occur after policy issuance. An event is a general term for things that happen, and it is divided into two groups: **Incidents** and **Claims**.
* **Incidents**: Unexpected events or occurrences that are recorded and tracked, as they can potentially become a lawsuit or claim.
* **Claims**: Typically created when an incident leads to a formal lawsuit or a demand for money being made.
For more information about events, claims, and incidents, see the [Understanding Events documentation](/events/understanding-events).
**What Should Be Added Here?**
Add custom fields that:
* Apply to individual events (claims or incidents)
* Track information about events that occur after policy issuance
* Are used for managing and reporting on claims and incidents
Examples of event-level fields include:
* Claim number or incident number
* Incident date and time
* Loss amount
* Reserve information
* Event status
* Claimant details
* Allegation information
**How to Fill Out This Tab:**
The column structure is identical to the System Default Fields tab. When filling out event fields:
1. **Location**: Set this to **"Event Details"** for all event fields
2. **Field Name**: Use clear, descriptive names that indicate the field is event-related
3. **Definition**: Provide a clear explanation of what information the field captures and how it's used
**Important Notes:**
* Only event-level fields should be added here—policy and exposure fields belong in their respective tabs
* Event fields apply to both claims and incidents, as they share the same data structure
* Refer to the System Default Fields Tab section above for detailed column explanations
### Step 3: Review and Submit the Spreadsheet
Once you have completed filling out the Field Data Model spreadsheet:
1. **Review the spreadsheet** to ensure all information is accurate and complete
2. **Send it back to the onboarding team** via the designated channel (typically Rocketlane)
3. **Schedule a meeting** with the onboarding team to review your field mapping and move forward with the configuration
The onboarding team will use your completed spreadsheet to configure your AI Insurance instance to match your specific data model and workflows.
Available field types:
* **Text**: Free-form text input. Example: "ABC Insurance Company" or "Medical Professional Liability"
* **Number**: Numeric values. Example: `123421` (policy number) or `5000` (quantity)
* **Currency**: Monetary values. Example: `$1,000.00` or `USD 50,000`
* **Percentage**: Percentage values. Example: `12.5%` or `5%`
* **Date**: Date values. Example: `01/15/2024` or `12/31/2025`
* **Address**: Address information. Example: `123 Main St, New York, NY 10001`
* **Website**: URL or website links. Example: `https://example.com` or `www.company.com`
* **Dropdown**: Single selection from a list. Example: Select "Active" from \[Active, Inactive, Pending]
* **Multi-select Dropdown**: Multiple selections from a list. Example: Select "General Liability" and "Property" from coverage options
* **Possible Values**: Provide an example value that demonstrates what data would be entered in this field. This serves as a reference to help understand the expected input format and content.
Example: If the field is called "Insured ID" and it's a number field, the possible value would be `123123123`. If it's a text field called "Company Name", the possible value might be `ABC Insurance Company`.
* **Display Logic**: AI Insurance supports the following display logic options:
1. **Conditional Field Display**: If field 1 equals X, show field Y. Multiple conditions can be combined using AND and OR operators.
2. **Default Values**: Set default values for fields, including default values based on other fields. For example, if field X equals a specific value, pre-fill field Y with a corresponding value.
3. **Validation Logic**: Define numerical range validation. For example, a field must fall within a specific numerical range (e.g., between 0 and 100).
* **Export Required**: This section indicates whether this field is required when exporting policies, events, or exposures. Specify if the field should be included in exports by default. For more information about adding fields for export, see the [Export Customization and Configuration documentation](/platform/reporting-and-reports/export-customization-and-configuration#add-fields-for-export).
The Policy Fields tab follows the same structure and column requirements as the System Default Fields tab. The columns are very similar, but only policy-level data will be displayed here.
**What is Policy Level Rating Data?**
Policy level rating data refers to information that applies to the **entire policy** and is used for **rating calculations**. This is different from policy details, which are also policy-level but are **not** used for rating. Policy level rating data affects how premiums are calculated for the entire policy.
**What Should Be Added Here?**
Add custom fields that:
* Apply to the entire policy (not specific to individual exposures)
* Are used in rating calculations to determine premium
* Represent policy-wide characteristics that impact pricing
Examples of policy level rating data include:
* Policy-wide discount factors
* Overall policy risk modifiers
* Policy-level surcharges or credits
* Aggregate policy characteristics used in rating formulas
**Important Notes:**
* The column structure is identical to the System Default Fields tab
* When setting the **Location** field, use **"Policy Ratings"** for fields used in rating, or **"Policy Details"** for policy-level information not used in rating
* Only policy-level fields should be added here—exposure-specific fields belong in the Exposure Fields tab
* Refer to the System Default Fields Tab section above for detailed column explanations
The Exposure Fields tab follows the same structure and column requirements as the [System Default Fields Tab](#system-default-fields-tab) section above. The columns are very similar, but only exposure-level data will be displayed here.
**What are Exposures?**
Exposures are all the entities (insureds) in each policy. Each policy can contain multiple exposures, and each exposure represents an individual entity or risk covered under the policy. For example, a single policy might cover multiple companies, healthcare providers, properties, vehicles, or other entity types. Each of these individual entities is considered an exposure.
To better understand exposures and how they relate to policies, refer to the [Understanding the AI Insurance Model documentation](/getting-started/intro-to-aiinsurance/understanding-the-ai-insurance-model) and the [Rating Engine documentation](/getting-started/setting-up-ai-insurance/rating-engine/rating-engine).
**What Should Be Added Here?**
Add custom fields that:
* Apply to individual exposures (entities) within a policy
* Are specific to each insured or risk, not the entire policy
* Are used in rating calculations at the exposure level
* Represent characteristics of individual entities that impact pricing
Examples of exposure-level fields include:
* Individual insured details (company name, address, etc.)
* Exposure-specific coverage limits
* Entity-specific risk characteristics
* Individual exposure ratings and modifiers
* Exposure-level deductibles or retentions
**How to Fill Out This Tab:**
The column structure is identical to the System Default Fields tab. When filling out exposure fields:
1. **Location**: Set this to **"Exposure Level Rating"** for fields used in rating calculations
2. **Exposure Type**: When Location is set to "Exposure Level Rating", you must specify which entity type this field applies to (e.g., Company, Healthcare Provider, Property, Auto, Location). Use the dropdown to select the appropriate entity type. For more information about entity types, see the [Rating Engine documentation](/getting-started/setting-up-ai-insurance/rating-engine/rating-engine#what-are-entity-types%3F).
3. **Relationship to Policy (optional)**: If needed, specify the relationship between the exposure and the policy (First Named Insured, Named Insured, Additional Insured, or Related Entity/Exposure)
**Important Notes:**
* Only exposure-level fields should be added here—policy-level fields belong in the Policy Fields tab
* Each exposure field must specify which entity type it applies to when used for rating
* Refer to the System Default Fields Tab section above for detailed column explanations
The Event Fields tab follows the same structure and column requirements as the [System Default Fields Tab](#system-default-fields-tab) section above. The columns are very similar, but only event-level data will be displayed here.
**What are Events?**
Events are operational records that track **claims** and **incidents** that occur after policy issuance. An event is a general term for things that happen, and it is divided into two groups: **Incidents** and **Claims**.
* **Incidents**: Unexpected events or occurrences that are recorded and tracked, as they can potentially become a lawsuit or claim.
* **Claims**: Typically created when an incident leads to a formal lawsuit or a demand for money being made.
For more information about events, claims, and incidents, see the [Understanding Events documentation](/events/understanding-events).
**What Should Be Added Here?**
Add custom fields that:
* Apply to individual events (claims or incidents)
* Track information about events that occur after policy issuance
* Are used for managing and reporting on claims and incidents
Examples of event-level fields include:
* Claim number or incident number
* Incident date and time
* Loss amount
* Reserve information
* Event status
* Claimant details
* Allegation information
**How to Fill Out This Tab:**
The column structure is identical to the System Default Fields tab. When filling out event fields:
1. **Location**: Set this to **"Event Details"** for all event fields
2. **Field Name**: Use clear, descriptive names that indicate the field is event-related
3. **Definition**: Provide a clear explanation of what information the field captures and how it's used
**Important Notes:**
* Only event-level fields should be added here—policy and exposure fields belong in their respective tabs
* Event fields apply to both claims and incidents, as they share the same data structure
* Refer to the System Default Fields Tab section above for detailed column explanations
### Step 3: Review and Submit the Spreadsheet
Once you have completed filling out the Field Data Model spreadsheet:
1. **Review the spreadsheet** to ensure all information is accurate and complete
2. **Send it back to the onboarding team** via the designated channel (typically Rocketlane)
3. **Schedule a meeting** with the onboarding team to review your field mapping and move forward with the configuration
The onboarding team will use your completed spreadsheet to configure your AI Insurance instance to match your specific data model and workflows.